> ## Documentation Index
> Fetch the complete documentation index at: https://docs.skyhook.io/llms.txt
> Use this file to discover all available pages before exploring further.
# Using Workflows
Skyhook provides both automated and manual workflows for building and deploying your services. This page covers day-to-day deployment operations.
## Automated Workflows
### Release Workflow
The **Release** workflow automatically triggers when you push to your main branch (typically `main` or `master`).
**What it does:**
1. Generates a unique image tag based on branch name, date, and build counter
2. Builds your Docker image
3. Pushes the image to your configured container registry
4. Optionally deploys to your development environment automatically
**Trigger:**
```yaml theme={"system"}
on:
push:
branches:
- main
```
**Use case:** Continuous deployment - every merge to main automatically builds and can deploy to dev.
### Monorepo Support
For monorepos containing multiple services, the Release workflow:
* Detects which services changed in the commit
* Builds only the affected services in parallel
* Uses a shared image tag across all services for consistency
* Can deploy all changed services to development automatically
## Manual Deployments
Skyhook provides flexible deployment options through manual workflows that are **primarily triggered from the Skyhook UI**, though they can also be run directly from GitHub Actions if needed.
### Deploying from the Skyhook UI
The easiest way to deploy your service is through the Skyhook web application:
1. Navigate to **Services → \[Your Service] → Deploy**
2. Choose your deployment mode:
* **Deploy Existing Image** - Deploy an already-built image
* **Build Image** - Build a new image and deploy it
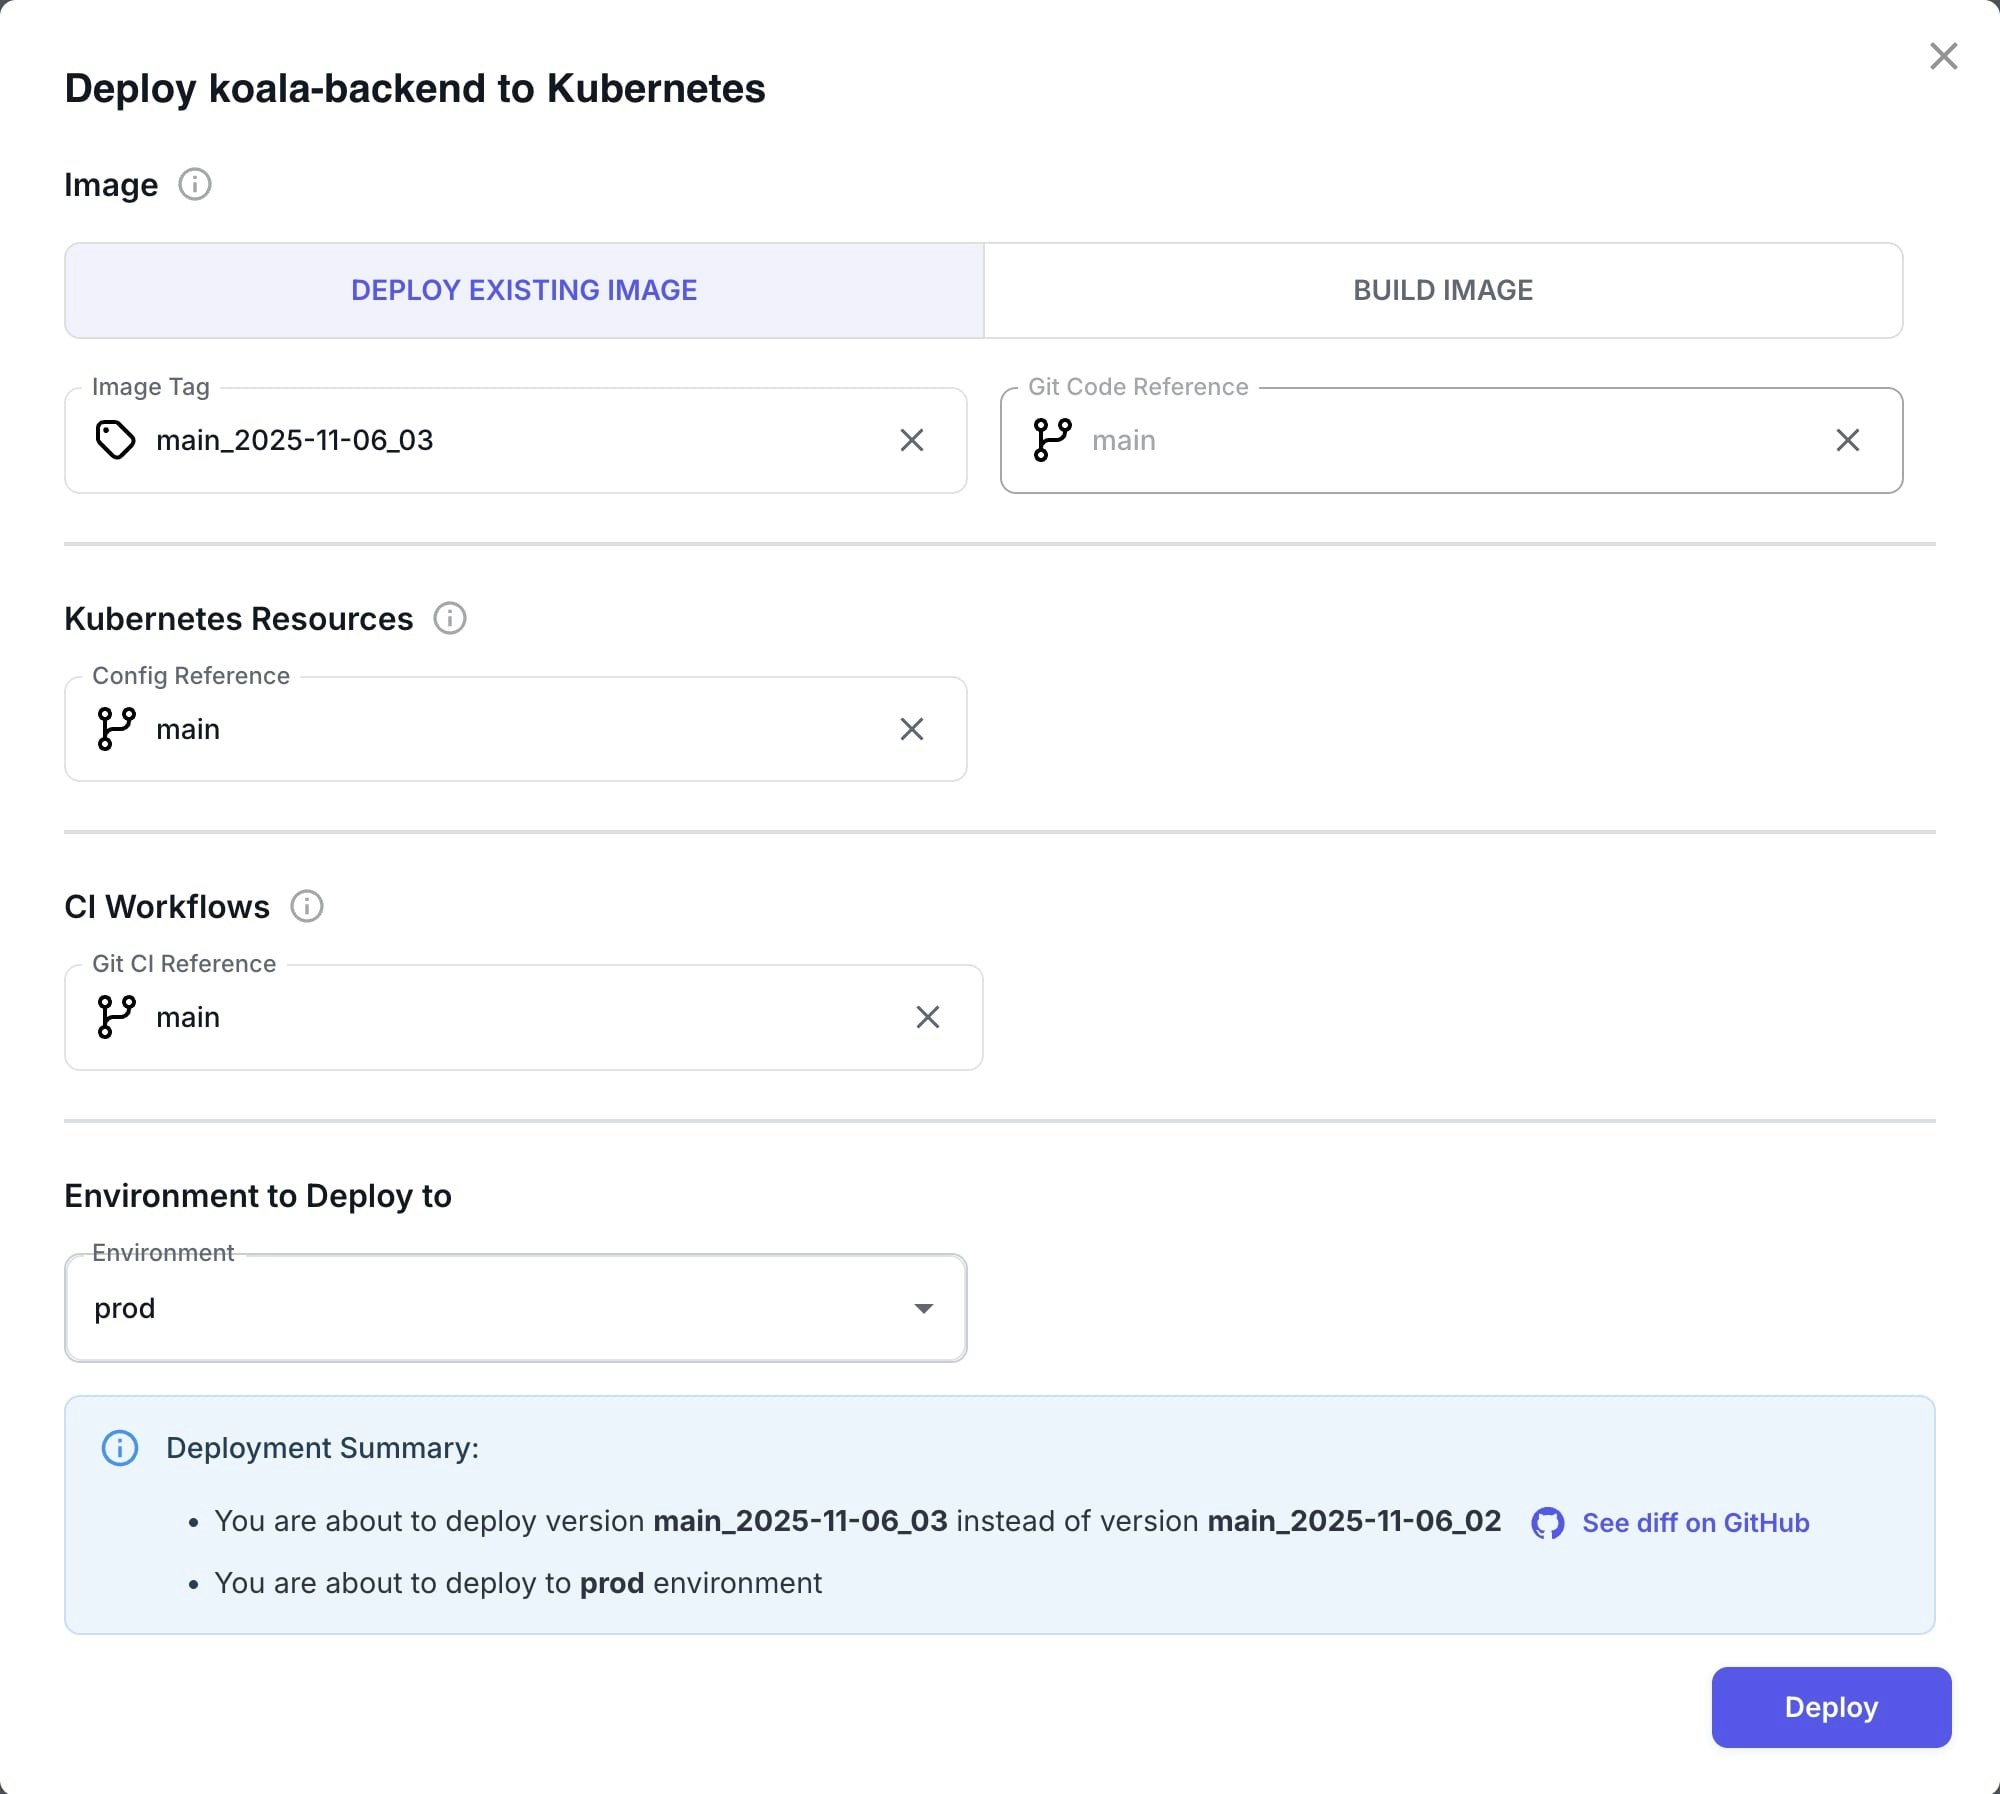 3. Configure your deployment:
* **Image Tag** (Deploy Existing) or **Git Code Reference** (Build Image) - Select what to deploy or build
* **Kubernetes Resources (Config Reference)** - Select Git reference for Kubernetes manifests
* **CI Workflows (Git CI Reference)** - Select Git reference for workflow files
* **Environment** - Choose target environment (dev, staging, production)
4. Select Git references using the branch/tag/commit picker:
3. Configure your deployment:
* **Image Tag** (Deploy Existing) or **Git Code Reference** (Build Image) - Select what to deploy or build
* **Kubernetes Resources (Config Reference)** - Select Git reference for Kubernetes manifests
* **CI Workflows (Git CI Reference)** - Select Git reference for workflow files
* **Environment** - Choose target environment (dev, staging, production)
4. Select Git references using the branch/tag/commit picker:
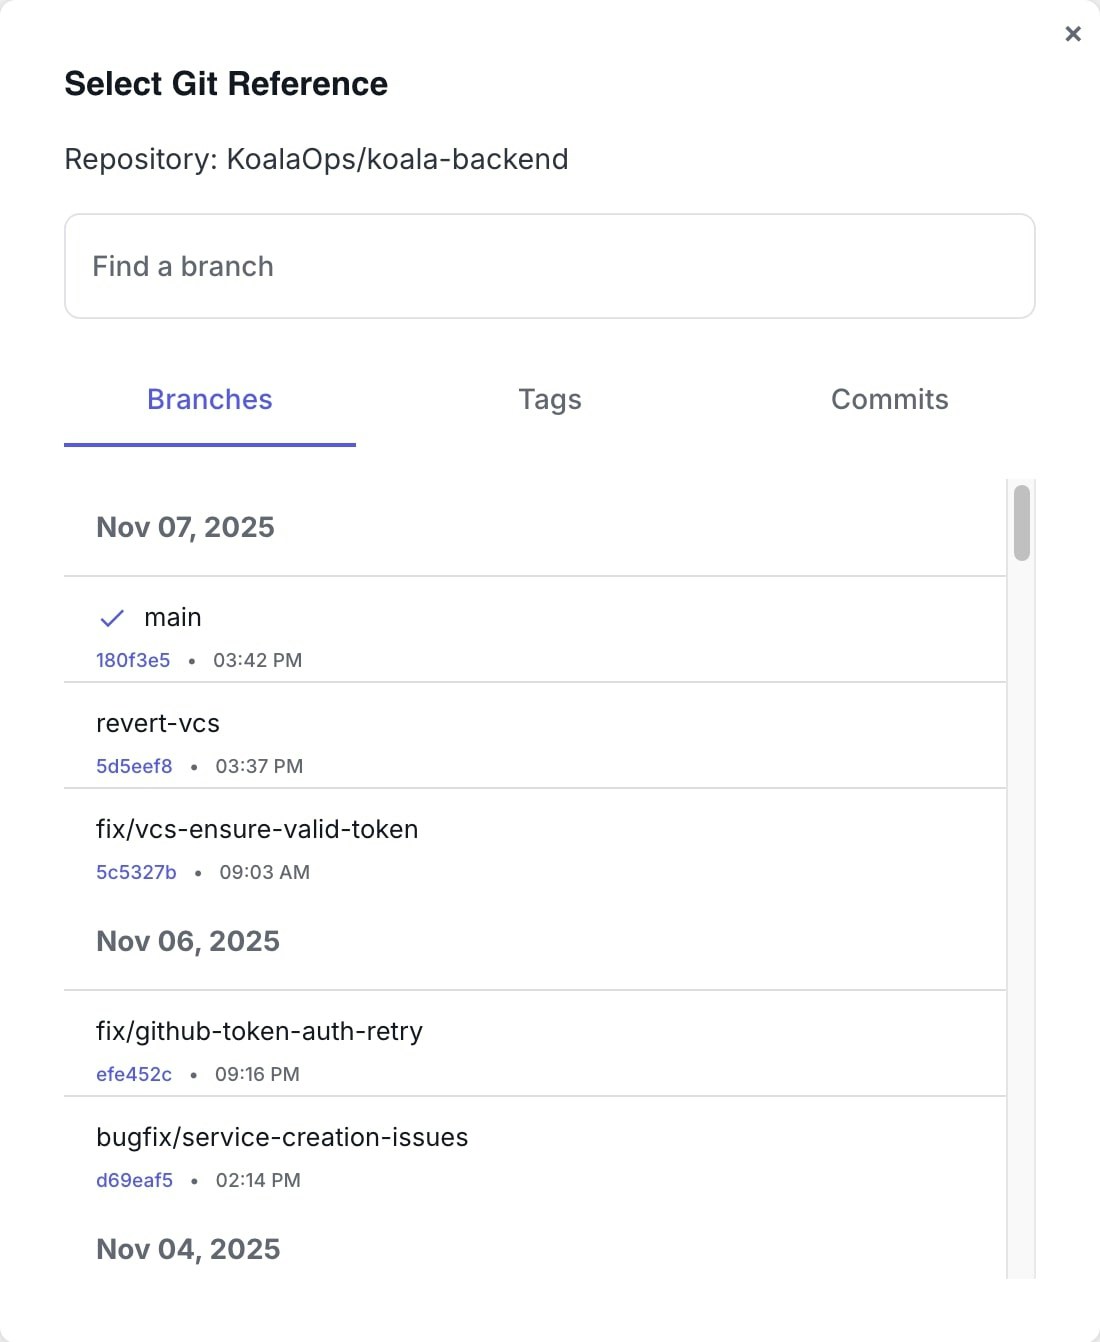 Each Git reference field opens a picker where you can:
* Search and select from **Branches**, **Tags**, or **Commits**
* See commit timestamps and SHAs
* Easily switch between different reference types
5. Review your deployment before confirming:
Each Git reference field opens a picker where you can:
* Search and select from **Branches**, **Tags**, or **Commits**
* See commit timestamps and SHAs
* Easily switch between different reference types
5. Review your deployment before confirming:
 The deployment summary shows:
* What branch/tag you're deploying from
* Current version vs new version
* Target environment
* Link to see the full diff on GitHub
6. Click **Deploy** to trigger the workflow
**Benefits of using the Skyhook UI:**
* Pre-filled defaults for your service configuration
* Visual interface for selecting environments and options
* Browse branches, tags, and commits without leaving the UI
* See deployment summary and diff before confirming
* Real-time feedback and deployment status
* No need to remember workflow input formats
* Automatically routes to the correct GitHub Actions workflow
### Deploying from GitHub Actions
You can also trigger deployments directly from GitHub:
1. Go to your repository on GitHub
2. Navigate to **Actions** tab
3. Select the workflow you want to run
4. Click **Run workflow**
5. Fill in the required inputs
**When to use GitHub directly:**
* Automation scripts or external CI/CD integrations
* Custom deployment pipelines
* Advanced users who prefer the GitHub interface
### Available Workflows
#### Build and Deploy
Builds a new Docker image and deploys it in one operation.
**When to use:**
* Deploying to staging or production from a specific branch
* Testing a feature branch before merging
* Creating a release from a specific commit or tag
**How to use:**
1. Select **Build Image** tab in the deploy dialog
2. Choose **Git Code Reference** (branch, tag, or commit to build from)
3. Set **Config Reference** for Kubernetes manifests (defaults to main)
4. Select target **Environment**
5. Review and confirm deployment
**Example scenarios:**
* Deploy `feature/new-api` branch to `dev` environment for testing
* Deploy `v1.2.3` tag to `production` with stable configuration
* Build from `main` branch and deploy to `staging`
#### Deploy Existing Image
Deploys an already-built Docker image without rebuilding.
**When to use:**
* Promoting an existing image from staging to production
* Rolling back to a previous version
* Deploying the same tested image to multiple clusters or environments
**How to use:**
1. Select **Deploy Existing Image** tab in the deploy dialog
2. Choose **Image Tag** from the list of available images
3. Set **Config Reference** for Kubernetes manifests
4. Select target **Environment**
5. Review and confirm deployment
**Example scenarios:**
* Promote `main-2024-01-15-42` image from staging to production
* Rollback production to previous stable image `v1.2.2`
* Deploy the same image across multiple regions
#### Build Image Only
Builds and pushes a Docker image without deploying it.
**When to use:**
* Pre-building images for later deployment
* Testing Docker builds without affecting running services
* Creating release candidates for approval before deployment
**How to use:**
1. Trigger the **Build Image** workflow from GitHub Actions
2. Specify the Git reference to build from
3. Optionally provide a custom image tag
4. The image will be built and pushed to your container registry
**Example scenarios:**
* Build release candidate images for testing: `rc-v1.3.0`
* Pre-build images during off-peak hours
* Create images for manual QA validation before deployment
## Understanding Git References
When deploying, you can specify different Git references for your code and configuration:
### Git Code Reference
* Where to build the Docker image from
* Can be a branch name (`main`, `feature/new-api`), tag (`v1.2.3`), or commit SHA
* Determines what code gets built into your container
### Git Config Reference (Kubernetes Resources)
* Where to get Kubernetes manifests and configuration from
* Typically uses `main` branch for stable configuration
* Can override to use feature branches or specific tags for testing
* Controls how your service is deployed (replicas, resources, environment variables, etc.)
### Git CI Reference (CI Workflows)
* Where to get the GitHub Actions workflow files from
* Usually points to `main` for stable CI/CD definitions
* Can be overridden when testing workflow changes
### Why Separate References?
This separation allows you to:
* **Test new code with stable configuration** - Deploy a feature branch with production-like config
* **Test configuration changes with stable code** - Update Kubernetes settings without code changes
* **Deploy hotfixes cleanly** - Fix code without modifying deployment configuration
* **Experiment safely** - Try different combinations without affecting your repository
**Example:** Deploy `feature/new-payment-api` code with `main` branch configuration to test the new API with production-like settings before merging.
## Viewing Deployments
In the Skyhook web app, navigate to **Services → \[Your Service] → CI/CD** to:
* View recent deployments and their status
* See which version is deployed to each environment
* Access direct links to GitHub Actions runs
* Monitor deployment progress in real-time
* Review deployment history and rollbacks
## Common Deployment Scenarios
### Deploying a Feature to Dev
1. Push your feature branch to GitHub
2. Open Skyhook UI → Services → Your Service → Deploy
3. Select **Build Image** tab
4. Choose your feature branch as **Git Code Reference**
5. Select `dev` environment
6. Click Deploy
### Promoting Staging to Production
1. Note the image tag currently deployed in staging (e.g., `main-2024-01-15-42`)
2. Open Skyhook UI → Services → Your Service → Deploy
3. Select **Deploy Existing Image** tab
4. Enter the staging image tag
5. Select `production` environment
6. Review the diff and click Deploy
### Rolling Back Production
1. Find the previous working image tag from deployment history
2. Open Skyhook UI → Services → Your Service → Deploy
3. Select **Deploy Existing Image** tab
4. Enter the previous image tag
5. Select `production` environment
6. Click Deploy
### Testing Configuration Changes
1. Create a branch with your configuration changes
2. Open Skyhook UI → Services → Your Service → Deploy
3. Select **Deploy Existing Image** tab
4. Choose the current stable image tag
5. Set **Config Reference** to your configuration branch
6. Select `dev` environment
7. Click Deploy
## Next Steps
* [Configuration & Setup](/application/cicd/configuration) - Configure authentication and advanced features
* [Troubleshooting](/application/cicd/troubleshooting) - Resolve common deployment issues
* [GitOps with ArgoCD](/infrastructure/gitops/overview) - Set up declarative deployments
The deployment summary shows:
* What branch/tag you're deploying from
* Current version vs new version
* Target environment
* Link to see the full diff on GitHub
6. Click **Deploy** to trigger the workflow
**Benefits of using the Skyhook UI:**
* Pre-filled defaults for your service configuration
* Visual interface for selecting environments and options
* Browse branches, tags, and commits without leaving the UI
* See deployment summary and diff before confirming
* Real-time feedback and deployment status
* No need to remember workflow input formats
* Automatically routes to the correct GitHub Actions workflow
### Deploying from GitHub Actions
You can also trigger deployments directly from GitHub:
1. Go to your repository on GitHub
2. Navigate to **Actions** tab
3. Select the workflow you want to run
4. Click **Run workflow**
5. Fill in the required inputs
**When to use GitHub directly:**
* Automation scripts or external CI/CD integrations
* Custom deployment pipelines
* Advanced users who prefer the GitHub interface
### Available Workflows
#### Build and Deploy
Builds a new Docker image and deploys it in one operation.
**When to use:**
* Deploying to staging or production from a specific branch
* Testing a feature branch before merging
* Creating a release from a specific commit or tag
**How to use:**
1. Select **Build Image** tab in the deploy dialog
2. Choose **Git Code Reference** (branch, tag, or commit to build from)
3. Set **Config Reference** for Kubernetes manifests (defaults to main)
4. Select target **Environment**
5. Review and confirm deployment
**Example scenarios:**
* Deploy `feature/new-api` branch to `dev` environment for testing
* Deploy `v1.2.3` tag to `production` with stable configuration
* Build from `main` branch and deploy to `staging`
#### Deploy Existing Image
Deploys an already-built Docker image without rebuilding.
**When to use:**
* Promoting an existing image from staging to production
* Rolling back to a previous version
* Deploying the same tested image to multiple clusters or environments
**How to use:**
1. Select **Deploy Existing Image** tab in the deploy dialog
2. Choose **Image Tag** from the list of available images
3. Set **Config Reference** for Kubernetes manifests
4. Select target **Environment**
5. Review and confirm deployment
**Example scenarios:**
* Promote `main-2024-01-15-42` image from staging to production
* Rollback production to previous stable image `v1.2.2`
* Deploy the same image across multiple regions
#### Build Image Only
Builds and pushes a Docker image without deploying it.
**When to use:**
* Pre-building images for later deployment
* Testing Docker builds without affecting running services
* Creating release candidates for approval before deployment
**How to use:**
1. Trigger the **Build Image** workflow from GitHub Actions
2. Specify the Git reference to build from
3. Optionally provide a custom image tag
4. The image will be built and pushed to your container registry
**Example scenarios:**
* Build release candidate images for testing: `rc-v1.3.0`
* Pre-build images during off-peak hours
* Create images for manual QA validation before deployment
## Understanding Git References
When deploying, you can specify different Git references for your code and configuration:
### Git Code Reference
* Where to build the Docker image from
* Can be a branch name (`main`, `feature/new-api`), tag (`v1.2.3`), or commit SHA
* Determines what code gets built into your container
### Git Config Reference (Kubernetes Resources)
* Where to get Kubernetes manifests and configuration from
* Typically uses `main` branch for stable configuration
* Can override to use feature branches or specific tags for testing
* Controls how your service is deployed (replicas, resources, environment variables, etc.)
### Git CI Reference (CI Workflows)
* Where to get the GitHub Actions workflow files from
* Usually points to `main` for stable CI/CD definitions
* Can be overridden when testing workflow changes
### Why Separate References?
This separation allows you to:
* **Test new code with stable configuration** - Deploy a feature branch with production-like config
* **Test configuration changes with stable code** - Update Kubernetes settings without code changes
* **Deploy hotfixes cleanly** - Fix code without modifying deployment configuration
* **Experiment safely** - Try different combinations without affecting your repository
**Example:** Deploy `feature/new-payment-api` code with `main` branch configuration to test the new API with production-like settings before merging.
## Viewing Deployments
In the Skyhook web app, navigate to **Services → \[Your Service] → CI/CD** to:
* View recent deployments and their status
* See which version is deployed to each environment
* Access direct links to GitHub Actions runs
* Monitor deployment progress in real-time
* Review deployment history and rollbacks
## Common Deployment Scenarios
### Deploying a Feature to Dev
1. Push your feature branch to GitHub
2. Open Skyhook UI → Services → Your Service → Deploy
3. Select **Build Image** tab
4. Choose your feature branch as **Git Code Reference**
5. Select `dev` environment
6. Click Deploy
### Promoting Staging to Production
1. Note the image tag currently deployed in staging (e.g., `main-2024-01-15-42`)
2. Open Skyhook UI → Services → Your Service → Deploy
3. Select **Deploy Existing Image** tab
4. Enter the staging image tag
5. Select `production` environment
6. Review the diff and click Deploy
### Rolling Back Production
1. Find the previous working image tag from deployment history
2. Open Skyhook UI → Services → Your Service → Deploy
3. Select **Deploy Existing Image** tab
4. Enter the previous image tag
5. Select `production` environment
6. Click Deploy
### Testing Configuration Changes
1. Create a branch with your configuration changes
2. Open Skyhook UI → Services → Your Service → Deploy
3. Select **Deploy Existing Image** tab
4. Choose the current stable image tag
5. Set **Config Reference** to your configuration branch
6. Select `dev` environment
7. Click Deploy
## Next Steps
* [Configuration & Setup](/application/cicd/configuration) - Configure authentication and advanced features
* [Troubleshooting](/application/cicd/troubleshooting) - Resolve common deployment issues
* [GitOps with ArgoCD](/infrastructure/gitops/overview) - Set up declarative deployments