> ## Documentation Index
> Fetch the complete documentation index at: https://docs.skyhook.io/llms.txt
> Use this file to discover all available pages before exploring further.
# Onboarding Guide
> Provision new Kubernetes clusters and set up your infrastructure
**Total time: \~30-45 minutes** (varies by provisioning method)
The Skyhook onboarding guide is an interactive wizard that walks you through provisioning **new Kubernetes clusters** and configuring essential infrastructure. If you already have existing clusters, see the [Quick Start](/getting-started/quick-start) guide instead.
The onboarding wizard appears automatically when you first sign in to [app.skyhook.io](https://app.skyhook.io). It remembers your progress and picks up where you left off if you exit partway through.
## UI or CLI
The same onboarding flow is available from the terminal:
```bash theme={"system"}
skyhook onboard
```
The CLI version runs the same cluster-connect → GitHub OIDC → ArgoCD bootstrap → first-service sequence as the UI wizard, and is often faster when you already have `kubectl`, `gcloud`/`aws`, and `gh` set up locally — it can detect your current cluster, register the OIDC trust, and `helm install` the connector without you copy-pasting commands between pages. You can also run individual steps (`skyhook onboard cluster connect`, `skyhook onboard github`, `skyhook onboard argocd`) and check progress at any time with `skyhook onboard status`.
The rest of this page describes the **UI wizard**. Pages linked from each step explain the matching CLI commands.
## First-time login
When you sign in for the very first time, Skyhook walks you through a short setup before the main wizard appears:
If your GitHub account belongs to multiple organizations, Skyhook shows an **organization selection** page. Pick the org you want this Skyhook tenant to be scoped to. You can switch organizations later from the sidebar org picker.
Skyhook asks whether you want to **connect an existing cluster** (fast path, see [Quick Start](/getting-started/quick-start)) or **provision a new one** (slower, this guide). You can mix — provision one cluster now, connect others later.
Skyhook opens the onboarding wizard and you're on step 1.
## Prerequisite checklist on every page
As you set things up, Skyhook shows a **setup checklist** on pages that depend on prerequisites — Services, Jobs, Clusters, Environments, Addons, FinOps. Each checklist shows exactly what's missing and offers:
* A **Connect Cluster** primary action when a cluster is needed
* A **Setup Wizard** secondary action that reopens the onboarding wizard from where you left off
This way you never hit an empty or broken page — if a feature depends on something you haven't done yet, Skyhook tells you what and how to fix it.
## What the Guide Does
The onboarding wizard helps you set up Skyhook with your Kubernetes clusters. You can provision new clusters on a major cloud provider (GCP, AWS, or Azure) or connect existing clusters from any source - including on-prem, bare-metal, OVH, DigitalOcean, or any Kubernetes distribution. The wizard walks you through:
* **Cluster Provisioning** - Create new Kubernetes clusters using Terraform, CloudFormation, or Skyhook's Infra-Manager
* **VPC Network Setup** - Automatically configure networking infrastructure
* **Skyhook Cluster Connector Installation** - Connect clusters to Skyhook for monitoring and management
* **GitHub & GitOps Setup** - Configure GitHub access and install ArgoCD
* **Addon Configuration** - Set up cert-manager and nginx-ingress
* **Service Import** - Optionally import existing services
The wizard automatically handles VPC network setup and cluster provisioning. You'll need to provide cloud provider credentials and configuration settings.
## Before You Start
### Cloud Provider Requirements
Ensure you have the necessary cloud provider setup before starting the wizard:
**Required before onboarding**:
* GCP Account with a GCP Project
* Enabled APIs: "Artifact Registry API" and "Compute Engine API"
* Docker Image Registry (Google Artifact Registry or other compatible registry)
**What the wizard handles (if needed)**:
* VPC Network creation
* GKE cluster provisioning
**Required before onboarding**:
* AWS Account with an AWS Profile
* Docker Image Registry (AWS ECR or other compatible registry)
**What the wizard handles (if needed)**:
* VPC Network creation
* EKS cluster provisioning
**Required before onboarding**:
* Azure Account with subscription
* Docker Image Registry (Azure Container Registry or other compatible registry)
**What the wizard handles (if needed)**:
* VPC Network creation
* AKS cluster provisioning
**Required before onboarding**:
* An existing Kubernetes cluster (any distribution - on-prem, bare-metal, OVH, DigitalOcean, k3s, etc.)
* kubectl access to the cluster
* Docker Image Registry (Docker Hub, GitHub Container Registry, Harbor, or any OCI-compliant registry)
**No cloud provider account or CLI is required.**
The wizard will skip the provisioning step and go directly to cluster connection.
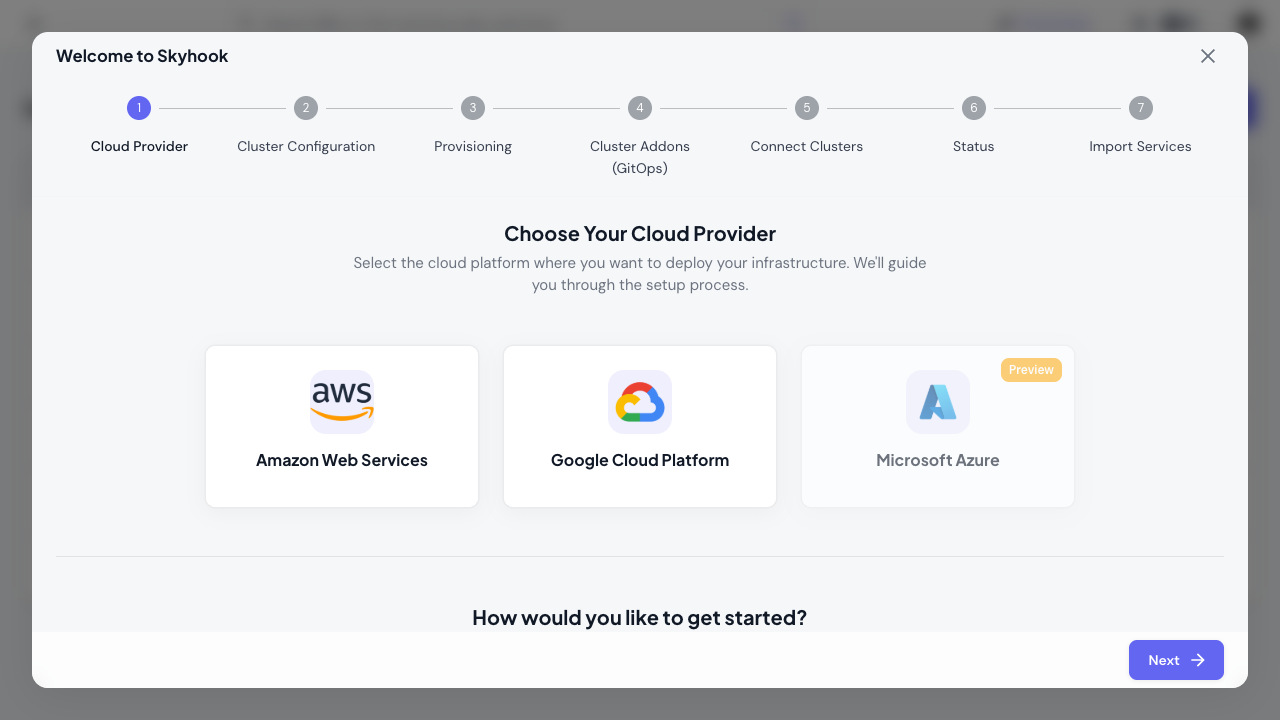
## Step 1: Cloud Provider Selection (2 min)
Choose your platform: AWS, GCP, Azure, or **Bring Your Own Cluster** for any other Kubernetes distribution. This determines which provisioning templates and configuration options are available. BYOK clusters skip provisioning and go directly to cluster connection.
 ## Step 2: Provision New Cluster (15-30 min)
The wizard guides you through cluster provisioning:
### Provisioning Configuration (5 min)
1. **Provision Method**: Choose your infrastructure tool
* **Terraform** - Use Skyhook's Terraform templates
* **Native Platform Tools** - AWS CloudFormation/GCP Deployment Manager/ARM Tempaltes
2. **Topology**: Select your cluster layout
* **Single Cluster** - All environments in one cluster (lean setup)
* **Multi-Cluster** - Separate clusters for prod/non-prod + management cluster (recommended)
3. **Configuration**: Fill in cloud-specific settings
* Cluster name, region/zone
* Node pool size and machine types
* Network configuration
4. **Execution Method** (Terraform only):
* **Manual** - Download Terraform files and run locally
* **Automated** - Let Skyhook execute via GitHub Actions
### Provisioning Execution (10-20 min)
The wizard generates your infrastructure code and guides you through execution. Provisioning time varies by cloud provider and cluster size.
### Connect Provisioned Cluster (5 min)
Once provisioning completes:
1. Install the Skyhook Connector using the provided `helm install` command
2. Verify the cluster connection appears **ONLINE** in the Skyhook dashboard
## Step 3: GitHub & GitOps Setup (5 min)
The wizard sets up GitHub access and GitOps automation using ArgoCD:
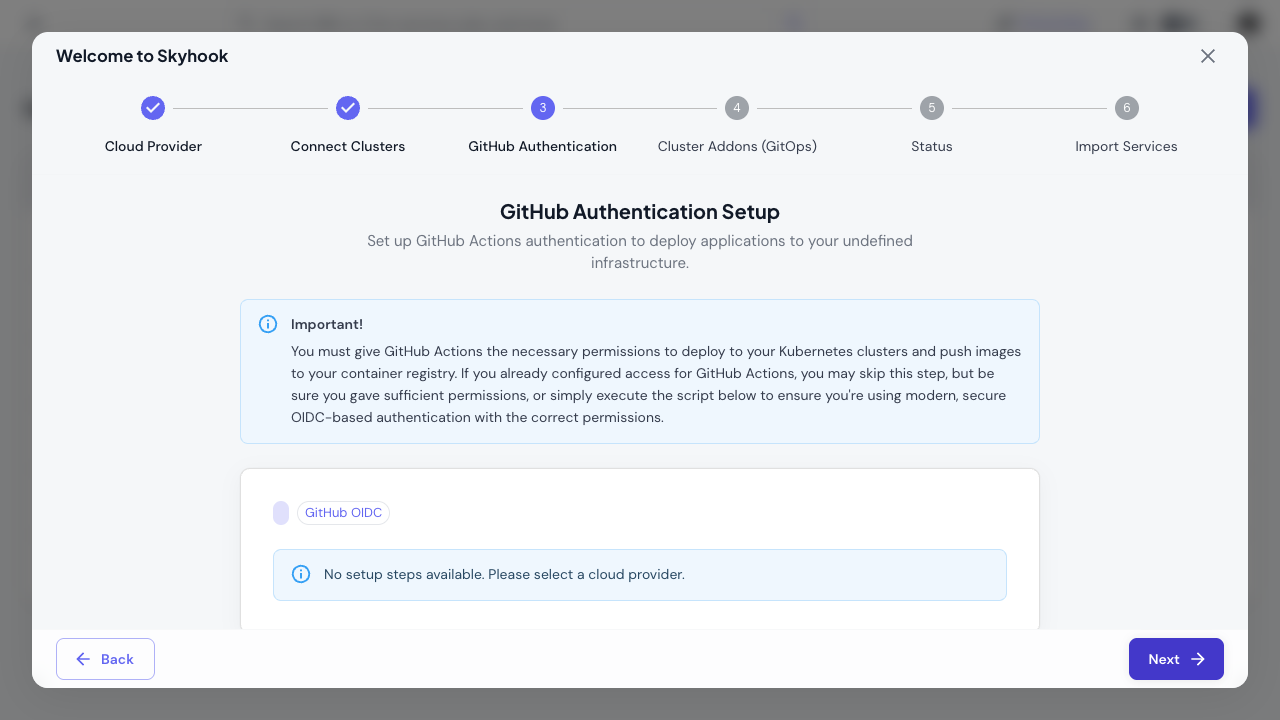
### GitHub Authentication
Choose your authentication method:
* **GitHub Token** - Manual personal access token setup
* **GitHub OIDC** - Automated OIDC-based authentication (recommended)
This grants ArgoCD access to your repositories for GitOps workflows.
## Step 2: Provision New Cluster (15-30 min)
The wizard guides you through cluster provisioning:
### Provisioning Configuration (5 min)
1. **Provision Method**: Choose your infrastructure tool
* **Terraform** - Use Skyhook's Terraform templates
* **Native Platform Tools** - AWS CloudFormation/GCP Deployment Manager/ARM Tempaltes
2. **Topology**: Select your cluster layout
* **Single Cluster** - All environments in one cluster (lean setup)
* **Multi-Cluster** - Separate clusters for prod/non-prod + management cluster (recommended)
3. **Configuration**: Fill in cloud-specific settings
* Cluster name, region/zone
* Node pool size and machine types
* Network configuration
4. **Execution Method** (Terraform only):
* **Manual** - Download Terraform files and run locally
* **Automated** - Let Skyhook execute via GitHub Actions
### Provisioning Execution (10-20 min)
The wizard generates your infrastructure code and guides you through execution. Provisioning time varies by cloud provider and cluster size.
### Connect Provisioned Cluster (5 min)
Once provisioning completes:
1. Install the Skyhook Connector using the provided `helm install` command
2. Verify the cluster connection appears **ONLINE** in the Skyhook dashboard
## Step 3: GitHub & GitOps Setup (5 min)
The wizard sets up GitHub access and GitOps automation using ArgoCD:
### GitHub Authentication
Choose your authentication method:
* **GitHub Token** - Manual personal access token setup
* **GitHub OIDC** - Automated OIDC-based authentication (recommended)
This grants ArgoCD access to your repositories for GitOps workflows.
 ### ArgoCD Installation
The wizard guides you through installing ArgoCD:
1. Run the provided `helm install` command to deploy ArgoCD on your management cluster
2. Set up a GitOps repository (create new or connect existing)
3. Configure repository access for ArgoCD
ArgoCD is Skyhook's recommended approach for managing cluster addons. It provides GitOps-based automation, version control, and drift detection for your infrastructure.
## Step 4: Addon Configuration (3 min)
Configure essential Kubernetes addons through the wizard:
### Core Addons
* **cert-manager** - Automates TLS certificate management with Let's Encrypt
* **nginx-ingress** - Handles ingress routing and load balancing
### Configuration
The wizard helps you:
* Select which clusters to install each addon on
* Configure addon settings (ingress class, certificate issuers, etc.)
* Generate ArgoCD Applications to manage the addons
Once configured, ArgoCD automatically deploys and maintains these addons across your clusters.
## Step 5: Import Services (2 min)
Import existing services from your repositories or create new services. You can skip this step and add services later.
Service import is optional during onboarding. You can import or create services anytime from the Services page. See [Creating and Importing Services](/application/services/create-import) for details.
## After Onboarding
Once the wizard completes, you'll have:
* ✅ Kubernetes clusters connected and monitored by Skyhook
* ✅ Skyhook Cluster Connector syncing cluster state in real-time
* ✅ ArgoCD managing your infrastructure via GitOps
* ✅ cert-manager automating TLS certificates
* ✅ nginx-ingress handling external traffic
* ✅ GitOps repository with all configurations version-controlled
You can now:
* [Deploy services](/application/services/overview) to your clusters
* [Monitor cluster health](/infrastructure/clusters/cluster-view) and resources
* [Manage addons](/infrastructure/gitops/management-cluster) through the GitOps control plane
* [Configure environments](/application/environments/overview) for your applications
## Recommended Tools
These tools are worth having for working with Skyhook and Kubernetes:
```bash theme={"system"}
# Basic Kubernetes tools
brew install kubectl kustomize helm
# Development and workflow tools
brew install skaffold kubectx stern
# Optional: Skyhook CLI (web UI supports all features)
brew install skyhook-io/tap/skyhook
```
### Alternative: Install Skyhook CLI on Windows or without Homebrew
**Windows (Scoop):**
```powershell theme={"system"}
scoop bucket add skyhook https://github.com/skyhook-io/scoop-bucket
scoop install skyhook
```
**macOS / Linux without Homebrew:**
```bash theme={"system"}
curl -fsSL https://get.skyhook.io/install.sh | sh
```
**Windows without Scoop (PowerShell):**
```powershell theme={"system"}
irm https://get.skyhook.io/install.ps1 | iex
```
For other cases, grab the latest release from [GitHub Releases](https://github.com/skyhook-io/skyhook-cli/releases/latest).
The Skyhook CLI includes a self-update command. Run `skyhook upgrade` to update to the latest version (Homebrew/Scoop users should upgrade through their package manager).
**Tool descriptions**:
* **kubectl** - Kubernetes command-line tool
* **kustomize** - Template-free Kubernetes configuration customization
* **helm** - Kubernetes package manager
* **skaffold** - Automates development workflows for Kubernetes applications
* **kubectx** - Simplifies working with multiple clusters and namespaces
* **stern** - Tails and filters logs from multiple pods and containers
* **skyhook CLI** - Optional command-line interface (all features available in web UI)
## Skipping Onboarding
You can skip the wizard and set things up manually:
1. [Connect clusters manually](/infrastructure/clusters/connecting-clusters)
2. [Set up ArgoCD](/infrastructure/gitops/overview) for addon management
3. Install addons via ArgoCD or helm directly
4. [Deploy services](/application/services/create-import) as needed
The manual approach gives you full control but requires more Kubernetes knowledge.
If you skip the onboarding wizard, make sure to install the Skyhook Cluster Connector on each cluster. Without it, Skyhook cannot monitor or manage your clusters.
## Next Steps
Start deploying applications to your clusters
View cluster status, nodes, and resource usage
Learn more about ArgoCD and GitOps workflows
Manage cluster addons via GitOps
Set up staging, production, and preview environments
Add environment variables and secrets to your services
## Need Help?
If you get stuck during onboarding:
* Check the inline help text in each wizard step
* Refer to our detailed guides for [clusters](/infrastructure/clusters/connecting-clusters), [GitOps](/infrastructure/gitops/overview), and [services](/application/services/overview)
* [Contact support](mailto:support@skyhook.io) for personalized assistance
### ArgoCD Installation
The wizard guides you through installing ArgoCD:
1. Run the provided `helm install` command to deploy ArgoCD on your management cluster
2. Set up a GitOps repository (create new or connect existing)
3. Configure repository access for ArgoCD
ArgoCD is Skyhook's recommended approach for managing cluster addons. It provides GitOps-based automation, version control, and drift detection for your infrastructure.
## Step 4: Addon Configuration (3 min)
Configure essential Kubernetes addons through the wizard:
### Core Addons
* **cert-manager** - Automates TLS certificate management with Let's Encrypt
* **nginx-ingress** - Handles ingress routing and load balancing
### Configuration
The wizard helps you:
* Select which clusters to install each addon on
* Configure addon settings (ingress class, certificate issuers, etc.)
* Generate ArgoCD Applications to manage the addons
Once configured, ArgoCD automatically deploys and maintains these addons across your clusters.
## Step 5: Import Services (2 min)
Import existing services from your repositories or create new services. You can skip this step and add services later.
Service import is optional during onboarding. You can import or create services anytime from the Services page. See [Creating and Importing Services](/application/services/create-import) for details.
## After Onboarding
Once the wizard completes, you'll have:
* ✅ Kubernetes clusters connected and monitored by Skyhook
* ✅ Skyhook Cluster Connector syncing cluster state in real-time
* ✅ ArgoCD managing your infrastructure via GitOps
* ✅ cert-manager automating TLS certificates
* ✅ nginx-ingress handling external traffic
* ✅ GitOps repository with all configurations version-controlled
You can now:
* [Deploy services](/application/services/overview) to your clusters
* [Monitor cluster health](/infrastructure/clusters/cluster-view) and resources
* [Manage addons](/infrastructure/gitops/management-cluster) through the GitOps control plane
* [Configure environments](/application/environments/overview) for your applications
## Recommended Tools
These tools are worth having for working with Skyhook and Kubernetes:
```bash theme={"system"}
# Basic Kubernetes tools
brew install kubectl kustomize helm
# Development and workflow tools
brew install skaffold kubectx stern
# Optional: Skyhook CLI (web UI supports all features)
brew install skyhook-io/tap/skyhook
```
### Alternative: Install Skyhook CLI on Windows or without Homebrew
**Windows (Scoop):**
```powershell theme={"system"}
scoop bucket add skyhook https://github.com/skyhook-io/scoop-bucket
scoop install skyhook
```
**macOS / Linux without Homebrew:**
```bash theme={"system"}
curl -fsSL https://get.skyhook.io/install.sh | sh
```
**Windows without Scoop (PowerShell):**
```powershell theme={"system"}
irm https://get.skyhook.io/install.ps1 | iex
```
For other cases, grab the latest release from [GitHub Releases](https://github.com/skyhook-io/skyhook-cli/releases/latest).
The Skyhook CLI includes a self-update command. Run `skyhook upgrade` to update to the latest version (Homebrew/Scoop users should upgrade through their package manager).
**Tool descriptions**:
* **kubectl** - Kubernetes command-line tool
* **kustomize** - Template-free Kubernetes configuration customization
* **helm** - Kubernetes package manager
* **skaffold** - Automates development workflows for Kubernetes applications
* **kubectx** - Simplifies working with multiple clusters and namespaces
* **stern** - Tails and filters logs from multiple pods and containers
* **skyhook CLI** - Optional command-line interface (all features available in web UI)
## Skipping Onboarding
You can skip the wizard and set things up manually:
1. [Connect clusters manually](/infrastructure/clusters/connecting-clusters)
2. [Set up ArgoCD](/infrastructure/gitops/overview) for addon management
3. Install addons via ArgoCD or helm directly
4. [Deploy services](/application/services/create-import) as needed
The manual approach gives you full control but requires more Kubernetes knowledge.
If you skip the onboarding wizard, make sure to install the Skyhook Cluster Connector on each cluster. Without it, Skyhook cannot monitor or manage your clusters.
## Next Steps
Start deploying applications to your clusters
View cluster status, nodes, and resource usage
Learn more about ArgoCD and GitOps workflows
Manage cluster addons via GitOps
Set up staging, production, and preview environments
Add environment variables and secrets to your services
## Need Help?
If you get stuck during onboarding:
* Check the inline help text in each wizard step
* Refer to our detailed guides for [clusters](/infrastructure/clusters/connecting-clusters), [GitOps](/infrastructure/gitops/overview), and [services](/application/services/overview)
* [Contact support](mailto:support@skyhook.io) for personalized assistance