> ## Documentation Index
> Fetch the complete documentation index at: https://docs.skyhook.io/llms.txt
> Use this file to discover all available pages before exploring further.
# Connecting Clusters
> Register and connect your Kubernetes clusters to Skyhook
Connect your Kubernetes clusters to Skyhook to enable monitoring, resource management, and automated deployments. Skyhook works with existing clusters; no need to provision new infrastructure.
**New to Skyhook?** Consider using the [Onboarding Guide](/getting-started/onboarding-guide) for guided setup. It walks you through cluster connection, ArgoCD installation, and addon configuration automatically.
This guide covers **manual cluster connection** for users who prefer direct control or already have infrastructure in place.
## Supported Cloud Providers

Google Cloud (GKE)
Fully supported

AWS (EKS)
Fully supported

Azure (AKS)
Private Beta
☸
Any Kubernetes
Fully supported
Interested in Azure support? [Contact us](mailto:support@skyhook.io) to join the private beta.
## Prerequisites
Before connecting a cluster, ensure you have:
### Required
* **Existing Kubernetes cluster** (GKE, EKS, AKS, or any conformant Kubernetes distribution)
* **kubectl** and **helm** installed locally
* **Cluster access** with permissions to install workloads
* **Cloud provider CLI** configured and authenticated (gcloud, aws, or az CLI) - only needed for managed cloud clusters
### Highly Recommended: Cluster Addons
Skyhook works best with these common Kubernetes addons:
* **[nginx-ingress controller](https://kubernetes.github.io/ingress-nginx/deploy/)** - Automated ingress configuration and TLS management
* **[cert-manager](https://cert-manager.io/docs/installation/)** - Automated certificate issuance and renewal
Without nginx-ingress and cert-manager, Skyhook can still monitor your cluster, but you'll need to manually handle ingress configuration and certificate management for your services.
#### Addon Management: ArgoCD vs Manual Installation
**We strongly recommend managing addons with ArgoCD** for GitOps-based automation:
**Why ArgoCD?**
* Version-controlled addon configurations in Git
* Automated deployment and updates across clusters
* Drift detection and self-healing
* Centralized management from Skyhook UI
**Setup Steps:**
1. Install ArgoCD on your management cluster ([guide](/infrastructure/gitops/overview#argocd-installation-guide))
2. Configure your GitOps repository
3. Use Skyhook's [GitOps settings page](https://app.skyhook.io/settings/gitops) to add addons
4. ArgoCD automatically deploys and maintains addons across your clusters
See the [GitOps with ArgoCD](/infrastructure/gitops/overview) documentation for detailed instructions.
The [Onboarding Guide](/getting-started/onboarding-guide) automates ArgoCD setup and addon configuration for you.
If you prefer not to use ArgoCD, you can install addons manually with helm:
**nginx-ingress:**
```bash theme={"system"}
helm repo add ingress-nginx https://kubernetes.github.io/ingress-nginx
helm repo update
helm install ingress-nginx ingress-nginx/ingress-nginx \
--namespace ingress-nginx \
--create-namespace
```
**cert-manager:**
```bash theme={"system"}
helm repo add jetstack https://charts.jetstack.io
helm repo update
helm install cert-manager jetstack/cert-manager \
--namespace cert-manager \
--create-namespace \
--set installCRDs=true
```
With manual installation, you'll need to handle addon updates, configuration changes, and multi-cluster consistency yourself.
#### Configuring cert-manager ClusterIssuer
**No manual configuration needed!** When you install cert-manager through Skyhook's addon system (via ArgoCD), a ClusterIssuer is automatically created and configured with Let's Encrypt.
The addon takes care of:
* Creating the `letsencrypt` ClusterIssuer
* Configuring HTTP01 challenge solver
* Setting up the necessary secrets
You can view and modify the ClusterIssuer configuration through the [Addons page](https://app.skyhook.io/addons).
If you installed cert-manager manually with helm, you'll need to create a ClusterIssuer yourself:
```yaml theme={"system"}
kubectl apply -f - <
## Connecting a Cluster
### Using the CLI (recommended)
If you already have a kubectl context for the cluster, the fastest path is:
```bash theme={"system"}
skyhook onboard cluster connect
```
[`skyhook onboard cluster connect`](/cli-reference/skyhook_onboard_cluster_connect) detects your cluster from the current kubectl context, auto-fills the cloud provider / account / region, registers the cluster with Skyhook, and runs the `helm install` for the connector — all in one shot. You can pass `--context ` to target a specific context, `--all` to register every unconnected context at once, or `--dry-run` to preview.
Once the connector comes online, skip to [Step 5: Verify Connection](#step-5-verify-connection) below.
For users who prefer the UI, or clusters where the CLI's auto-detection doesn't fit your environment, the per-provider flows below walk through it manually.
### Step 1: Gather Cluster Information
You'll need:
* **Cluster name** (exact name from GCP Console)
* **GCP Project ID** (e.g., `koala-ops-123`)
* **Zone** (e.g., `us-west1-a`) or **Region** (e.g., `us-west1` for regional clusters)
Find these values in the [GCP Console](https://console.cloud.google.com/kubernetes/list).
### Step 2: Authenticate to Your Cluster
Make sure `gcloud` and the GKE auth plugin are installed:
```bash theme={"system"}
gcloud components install gke-gcloud-auth-plugin
```
Authenticate to Google Cloud:
```bash theme={"system"}
gcloud auth login
```
Get cluster credentials:
```bash theme={"system"}
gcloud container clusters get-credentials CLUSTER_NAME \
--zone=COMPUTE_ZONE \
--project=PROJECT_ID
```
Verify access:
```bash theme={"system"}
kubectl cluster-info
```
### Step 3: Register the Cluster
1. Navigate to **Clusters → Connect** in the Skyhook UI
2. Select **GCP** as the cloud provider
3. Fill in your cluster details:
* Cluster name
* GCP Project ID
* Zone or Region
4. Click **Register Cluster**
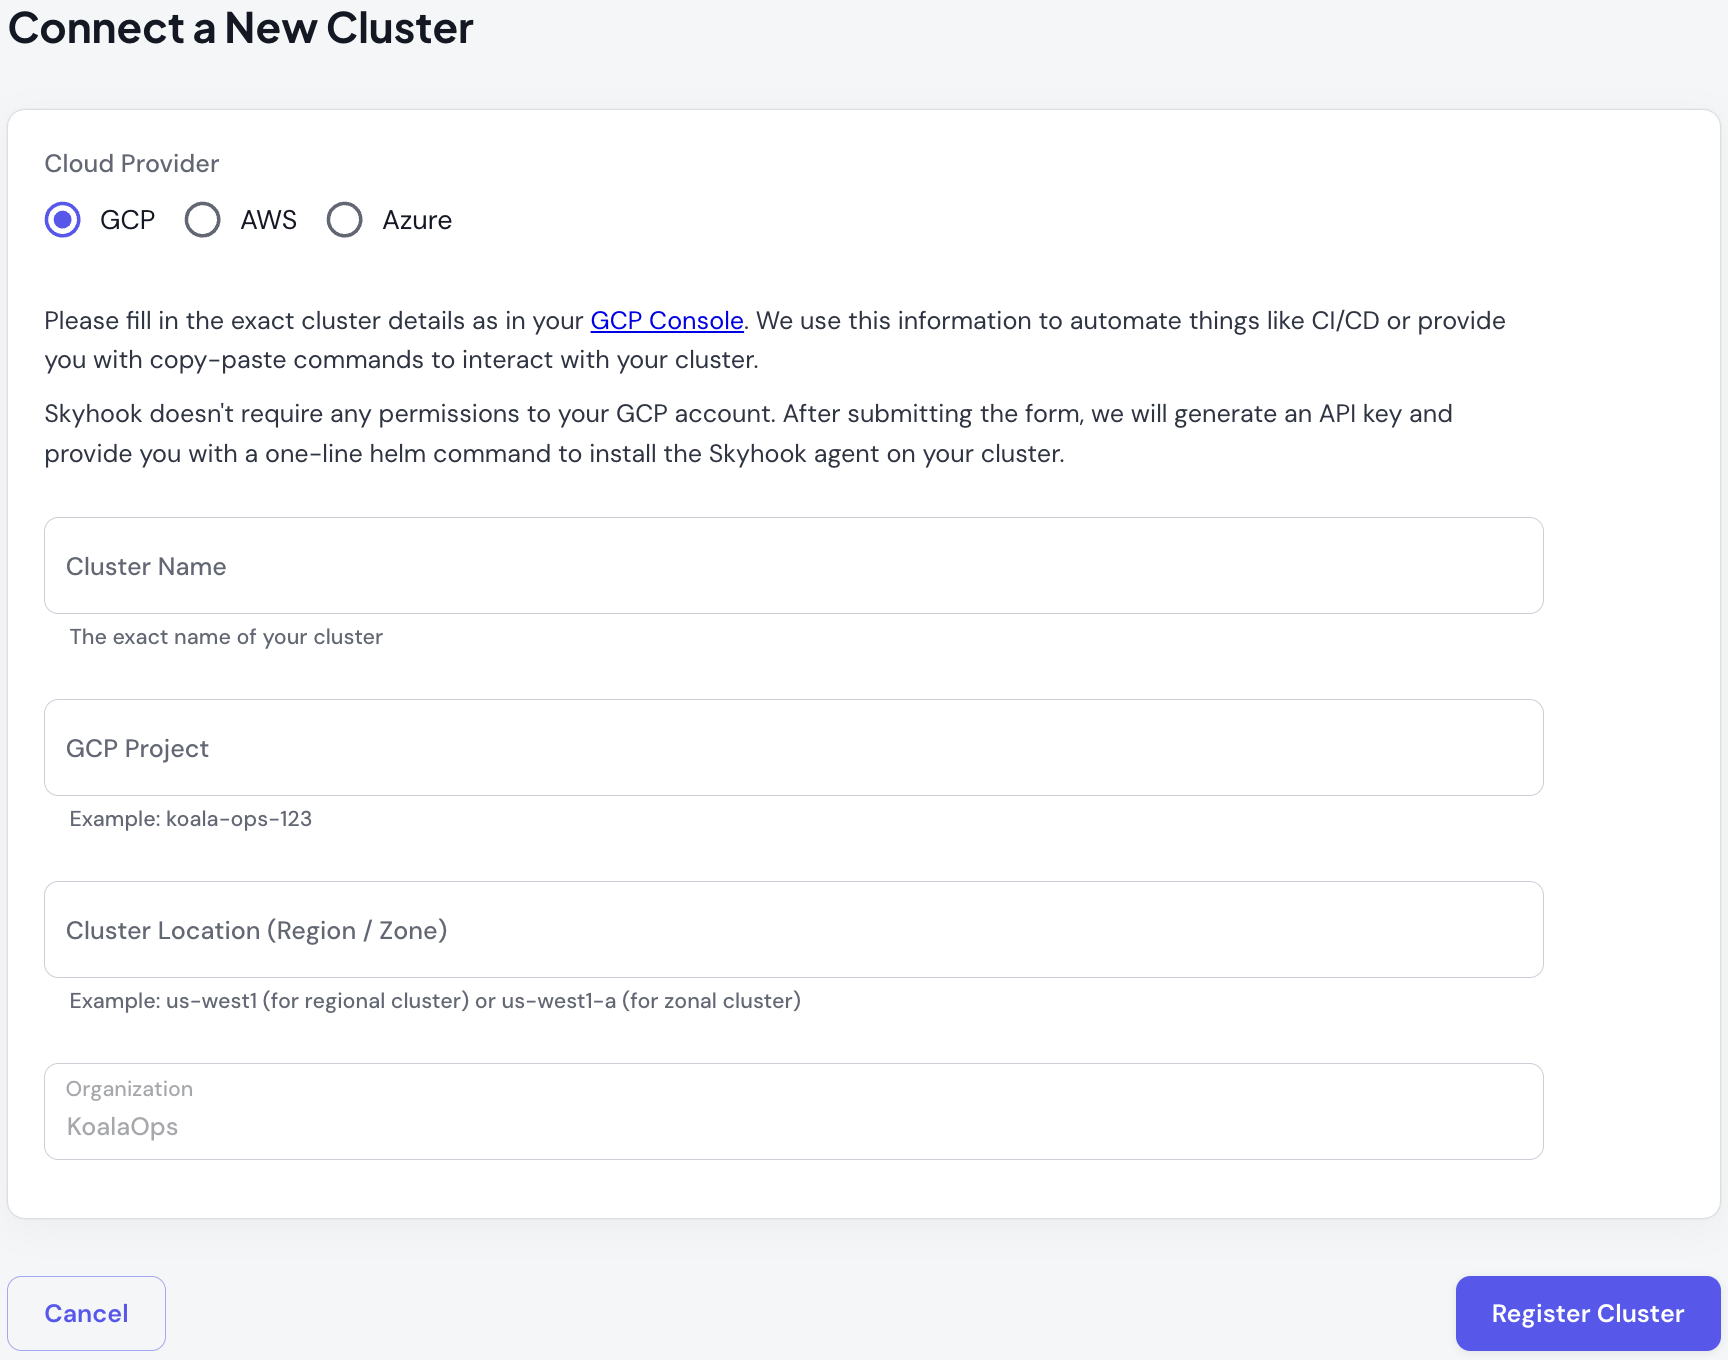 After registration, you'll see a `helm install` command with your cluster's unique API key.
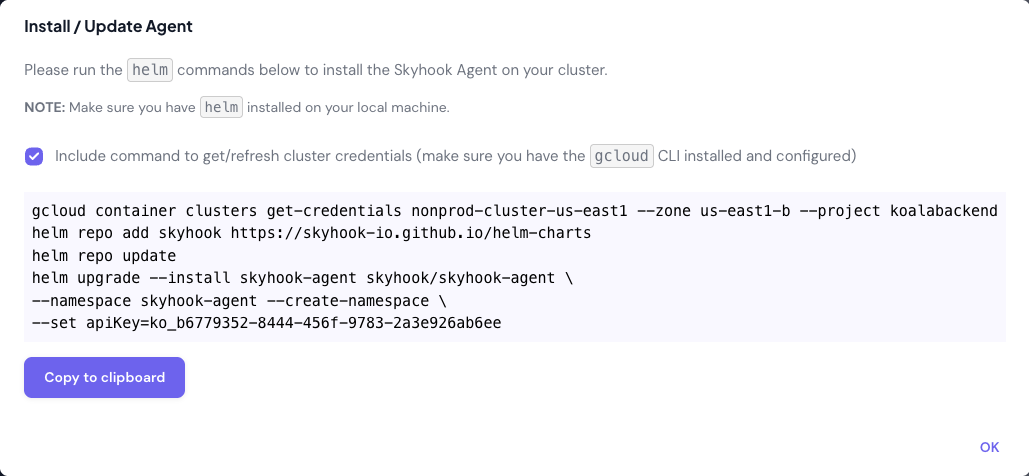 ### Step 4: Install the Cluster Connector
Copy the `helm install` command from the previous step and run it in your terminal:
```bash theme={"system"}
helm repo add skyhook https://skyhook-io.github.io/helm-charts
helm repo update
helm upgrade --install skyhook-cluster-connector skyhook/skyhook-cluster-connector \
--namespace skyhook-cluster-connector --create-namespace \
--set apiKey=
```
The Cluster Connector will start syncing data to Skyhook in under a minute.
### Step 5: Verify Connection
Return to **Clusters → List** in the Skyhook UI. Your cluster status should change from **WAITING FOR CHECK-IN** (blue) to **ONLINE** (green) in under a minute.
The Cluster Connector fetches cluster data on-demand when you use the Skyhook UI, ensuring you always see current information without unnecessary polling.
### Step 1: Gather Cluster Information
You'll need:
* **Cluster name** (exact name from AWS Console)
* **AWS Account ID** (12-digit account number)
* **Region** (e.g., `us-east-1`)
Find these values in the [EKS Console](https://console.aws.amazon.com/eks/home).
### Step 2: Authenticate to Your Cluster
Configure the AWS CLI if you haven't already:
```bash theme={"system"}
aws configure
# or for SSO:
aws configure sso
```
List your configured profiles:
```bash theme={"system"}
aws configure list-profiles
```
Update your kubeconfig for the EKS cluster:
```bash theme={"system"}
aws eks update-kubeconfig \
--name CLUSTER_NAME \
--region REGION \
--profile YOUR_PROFILE_NAME
```
Verify access:
```bash theme={"system"}
kubectl cluster-info
```
### Step 3: Register the Cluster
1. Navigate to **Clusters → Connect** in the Skyhook UI
2. Select **AWS** as the cloud provider
3. Fill in your cluster details:
* Cluster name
* AWS Account ID
* Region
4. Click **Register Cluster**
After registration, you'll see a `helm install` command with your cluster's unique API key.
### Step 4: Install the Cluster Connector
Copy the `helm install` command from the previous step and run it in your terminal:
```bash theme={"system"}
helm install skyhook-cluster-connector oci://us-docker.pkg.dev/skyhook-artifacts/skyhook-public/skyhook-cluster-connector \
--set apiKey=YOUR_CLUSTER_API_KEY \
--namespace skyhook-cluster-connector \
--create-namespace
```
The Cluster Connector will start syncing data to Skyhook within a few minutes.
### Step 5: Verify Connection
Return to **Clusters → List** in the Skyhook UI. Your cluster status should change from **WAITING FOR CHECK-IN** to **ONLINE** within 2-3 minutes.
Azure support is currently in private beta.
[Contact us](mailto:support@skyhook.io) to request access to the Azure private beta.
Once you're enrolled in the beta, we'll provide specific instructions for connecting your AKS clusters.
Skyhook supports any conformant Kubernetes cluster - on-prem, bare-metal, OVH, DigitalOcean, Linode, Civo, k3s, or any other distribution.
**We strongly recommend installing ArgoCD** on BYOK clusters. While Skyhook's CI/CD pipelines work without it, ArgoCD unlocks the full platform experience: automated addon management (cert-manager, nginx-ingress, OpenCost), GitOps-based configuration, drift detection, and multi-cluster consistency. The onboarding wizard will guide you through ArgoCD installation after connecting your cluster.
### Step 1: Verify Cluster Access
Ensure your kubeconfig is configured and you can access the cluster:
```bash theme={"system"}
kubectl cluster-info
kubectl get nodes
```
No cloud provider CLI is required.
### Step 2: Register the Cluster
1. Navigate to **Clusters → Connect** in the Skyhook UI
2. Select **Other / On-Prem** as the cloud provider
3. Fill in your cluster details:
* **Cluster name** (required) - a unique name for this cluster within your organization
* **Location** (optional) - where the cluster runs (e.g., `us-east`, `dc-1`, `paris`)
* **Organization / Group** (optional) - a label to group clusters (e.g., team name, datacenter, account)
4. Click **Register Cluster**
After registration, you'll see a `helm install` command with your cluster's unique API key.
### Step 3: Install the Cluster Connector
Copy the `helm install` command from the previous step and run it:
```bash theme={"system"}
helm repo add skyhook https://skyhook-io.github.io/helm-charts
helm repo update
helm upgrade --install skyhook-connector skyhook/skyhook-connector \
--namespace skyhook-connector --create-namespace \
--set apiKey=
```
The connector runs as a pod in your cluster and communicates outbound to the Skyhook API. No inbound ports or public endpoints are required.
### Step 4: Verify Connection
Return to **Clusters → List** in the Skyhook UI. Your cluster status should change from **WAITING FOR CHECK-IN** to **ONLINE** within a minute.
### What Works Differently with BYOK
Most Skyhook features work identically on BYOK clusters. A few things to be aware of:
* **Logging links**: Skyhook won't generate cloud-specific log console links (e.g., CloudWatch, Cloud Logging). Configure a custom logging URL template in your [organization settings](https://app.skyhook.io/settings) if you use Grafana, ELK, or another logging platform.
* **Cloud console links**: Links to cloud provider consoles (GCP Console, AWS Console) won't appear for BYOK clusters.
* **Cost tracking**: FinOps cloud cost integration requires a cloud billing account. OpenCost still provides cluster-level resource metrics without cloud billing data.
* **Container registry**: Use any OCI-compliant registry (Docker Hub, GitHub Container Registry, Harbor, Quay, etc.). Configure `imagePullSecrets` in your cluster if your registry requires authentication.
* **Secrets management**: External Secrets Operator works with any backend (HashiCorp Vault, AWS Secrets Manager, etc.). For BYOK, Vault or Sealed Secrets are common choices.
* **Storage classes**: Addons that need persistent storage (e.g., Prometheus via OpenCost) default to the `standard` StorageClass. If your cluster uses a different default, update the storage class in the addon configuration.
* **Ingress**: nginx-ingress works on any cluster. Cloud-specific ingress controllers (AWS ALB, GCE) are not applicable.
## Configuring DNS for Services
To expose services via ingress with custom domains, configure your DNS provider to point to your cluster's load balancer IP address.
### Single Cluster Setup
Find your cluster's external load balancer IP in the **Cluster detail page** (Networking section) or in your cloud provider's console.
Create an A record in your DNS provider:
```
example.com → A →
*.example.com → A →
```
### Multi-Cluster Load Balancing
If you're using a global load balancer across multiple clusters, continue managing DNS through your existing setup. Skyhook doesn't currently automate multi-cluster load balancing.
## Troubleshooting
### Cluster Status Stuck on "WAITING FOR CHECK-IN"
If your cluster remains in **WAITING FOR CHECK-IN** status for more than 5 minutes:
1. **Verify the Cluster Connector pod is running:**
```bash theme={"system"}
kubectl get pods -n skyhook-connector
```
Expected output: `STATUS: Running`
2. **Check connector logs for errors:**
```bash theme={"system"}
kubectl logs -n skyhook-connector -l app.kubernetes.io/name=skyhook-connector --tail=50
```
3. **Common issues:**
* **Firewall blocking egress**: Ensure your cluster can reach `*.skyhook.io` on port 443
* **Wrong API key**: Verify you used the helm command from the Skyhook UI (includes correct API key)
* **RBAC permissions**: The agent needs cluster-wide read permissions (automatically configured by the helm chart)
### Permission Errors During Helm Install
Make sure you have admin permissions in the cluster:
```bash theme={"system"}
kubectl auth can-i create clusterrole
```
If you see "no", contact your cluster administrator for the necessary permissions.
## Next Steps
Monitor cluster status and detect problems
Drill down into pods, services, and more
Deploy and configure applications
### Step 4: Install the Cluster Connector
Copy the `helm install` command from the previous step and run it in your terminal:
```bash theme={"system"}
helm repo add skyhook https://skyhook-io.github.io/helm-charts
helm repo update
helm upgrade --install skyhook-cluster-connector skyhook/skyhook-cluster-connector \
--namespace skyhook-cluster-connector --create-namespace \
--set apiKey=
```
The Cluster Connector will start syncing data to Skyhook in under a minute.
### Step 5: Verify Connection
Return to **Clusters → List** in the Skyhook UI. Your cluster status should change from **WAITING FOR CHECK-IN** (blue) to **ONLINE** (green) in under a minute.
The Cluster Connector fetches cluster data on-demand when you use the Skyhook UI, ensuring you always see current information without unnecessary polling.
### Step 1: Gather Cluster Information
You'll need:
* **Cluster name** (exact name from AWS Console)
* **AWS Account ID** (12-digit account number)
* **Region** (e.g., `us-east-1`)
Find these values in the [EKS Console](https://console.aws.amazon.com/eks/home).
### Step 2: Authenticate to Your Cluster
Configure the AWS CLI if you haven't already:
```bash theme={"system"}
aws configure
# or for SSO:
aws configure sso
```
List your configured profiles:
```bash theme={"system"}
aws configure list-profiles
```
Update your kubeconfig for the EKS cluster:
```bash theme={"system"}
aws eks update-kubeconfig \
--name CLUSTER_NAME \
--region REGION \
--profile YOUR_PROFILE_NAME
```
Verify access:
```bash theme={"system"}
kubectl cluster-info
```
### Step 3: Register the Cluster
1. Navigate to **Clusters → Connect** in the Skyhook UI
2. Select **AWS** as the cloud provider
3. Fill in your cluster details:
* Cluster name
* AWS Account ID
* Region
4. Click **Register Cluster**
After registration, you'll see a `helm install` command with your cluster's unique API key.
### Step 4: Install the Cluster Connector
Copy the `helm install` command from the previous step and run it in your terminal:
```bash theme={"system"}
helm install skyhook-cluster-connector oci://us-docker.pkg.dev/skyhook-artifacts/skyhook-public/skyhook-cluster-connector \
--set apiKey=YOUR_CLUSTER_API_KEY \
--namespace skyhook-cluster-connector \
--create-namespace
```
The Cluster Connector will start syncing data to Skyhook within a few minutes.
### Step 5: Verify Connection
Return to **Clusters → List** in the Skyhook UI. Your cluster status should change from **WAITING FOR CHECK-IN** to **ONLINE** within 2-3 minutes.
Azure support is currently in private beta.
[Contact us](mailto:support@skyhook.io) to request access to the Azure private beta.
Once you're enrolled in the beta, we'll provide specific instructions for connecting your AKS clusters.
Skyhook supports any conformant Kubernetes cluster - on-prem, bare-metal, OVH, DigitalOcean, Linode, Civo, k3s, or any other distribution.
**We strongly recommend installing ArgoCD** on BYOK clusters. While Skyhook's CI/CD pipelines work without it, ArgoCD unlocks the full platform experience: automated addon management (cert-manager, nginx-ingress, OpenCost), GitOps-based configuration, drift detection, and multi-cluster consistency. The onboarding wizard will guide you through ArgoCD installation after connecting your cluster.
### Step 1: Verify Cluster Access
Ensure your kubeconfig is configured and you can access the cluster:
```bash theme={"system"}
kubectl cluster-info
kubectl get nodes
```
No cloud provider CLI is required.
### Step 2: Register the Cluster
1. Navigate to **Clusters → Connect** in the Skyhook UI
2. Select **Other / On-Prem** as the cloud provider
3. Fill in your cluster details:
* **Cluster name** (required) - a unique name for this cluster within your organization
* **Location** (optional) - where the cluster runs (e.g., `us-east`, `dc-1`, `paris`)
* **Organization / Group** (optional) - a label to group clusters (e.g., team name, datacenter, account)
4. Click **Register Cluster**
After registration, you'll see a `helm install` command with your cluster's unique API key.
### Step 3: Install the Cluster Connector
Copy the `helm install` command from the previous step and run it:
```bash theme={"system"}
helm repo add skyhook https://skyhook-io.github.io/helm-charts
helm repo update
helm upgrade --install skyhook-connector skyhook/skyhook-connector \
--namespace skyhook-connector --create-namespace \
--set apiKey=
```
The connector runs as a pod in your cluster and communicates outbound to the Skyhook API. No inbound ports or public endpoints are required.
### Step 4: Verify Connection
Return to **Clusters → List** in the Skyhook UI. Your cluster status should change from **WAITING FOR CHECK-IN** to **ONLINE** within a minute.
### What Works Differently with BYOK
Most Skyhook features work identically on BYOK clusters. A few things to be aware of:
* **Logging links**: Skyhook won't generate cloud-specific log console links (e.g., CloudWatch, Cloud Logging). Configure a custom logging URL template in your [organization settings](https://app.skyhook.io/settings) if you use Grafana, ELK, or another logging platform.
* **Cloud console links**: Links to cloud provider consoles (GCP Console, AWS Console) won't appear for BYOK clusters.
* **Cost tracking**: FinOps cloud cost integration requires a cloud billing account. OpenCost still provides cluster-level resource metrics without cloud billing data.
* **Container registry**: Use any OCI-compliant registry (Docker Hub, GitHub Container Registry, Harbor, Quay, etc.). Configure `imagePullSecrets` in your cluster if your registry requires authentication.
* **Secrets management**: External Secrets Operator works with any backend (HashiCorp Vault, AWS Secrets Manager, etc.). For BYOK, Vault or Sealed Secrets are common choices.
* **Storage classes**: Addons that need persistent storage (e.g., Prometheus via OpenCost) default to the `standard` StorageClass. If your cluster uses a different default, update the storage class in the addon configuration.
* **Ingress**: nginx-ingress works on any cluster. Cloud-specific ingress controllers (AWS ALB, GCE) are not applicable.
## Configuring DNS for Services
To expose services via ingress with custom domains, configure your DNS provider to point to your cluster's load balancer IP address.
### Single Cluster Setup
Find your cluster's external load balancer IP in the **Cluster detail page** (Networking section) or in your cloud provider's console.
Create an A record in your DNS provider:
```
example.com → A →
*.example.com → A →
```
### Multi-Cluster Load Balancing
If you're using a global load balancer across multiple clusters, continue managing DNS through your existing setup. Skyhook doesn't currently automate multi-cluster load balancing.
## Troubleshooting
### Cluster Status Stuck on "WAITING FOR CHECK-IN"
If your cluster remains in **WAITING FOR CHECK-IN** status for more than 5 minutes:
1. **Verify the Cluster Connector pod is running:**
```bash theme={"system"}
kubectl get pods -n skyhook-connector
```
Expected output: `STATUS: Running`
2. **Check connector logs for errors:**
```bash theme={"system"}
kubectl logs -n skyhook-connector -l app.kubernetes.io/name=skyhook-connector --tail=50
```
3. **Common issues:**
* **Firewall blocking egress**: Ensure your cluster can reach `*.skyhook.io` on port 443
* **Wrong API key**: Verify you used the helm command from the Skyhook UI (includes correct API key)
* **RBAC permissions**: The agent needs cluster-wide read permissions (automatically configured by the helm chart)
### Permission Errors During Helm Install
Make sure you have admin permissions in the cluster:
```bash theme={"system"}
kubectl auth can-i create clusterrole
```
If you see "no", contact your cluster administrator for the necessary permissions.
## Next Steps
Monitor cluster status and detect problems
Drill down into pods, services, and more
Deploy and configure applications