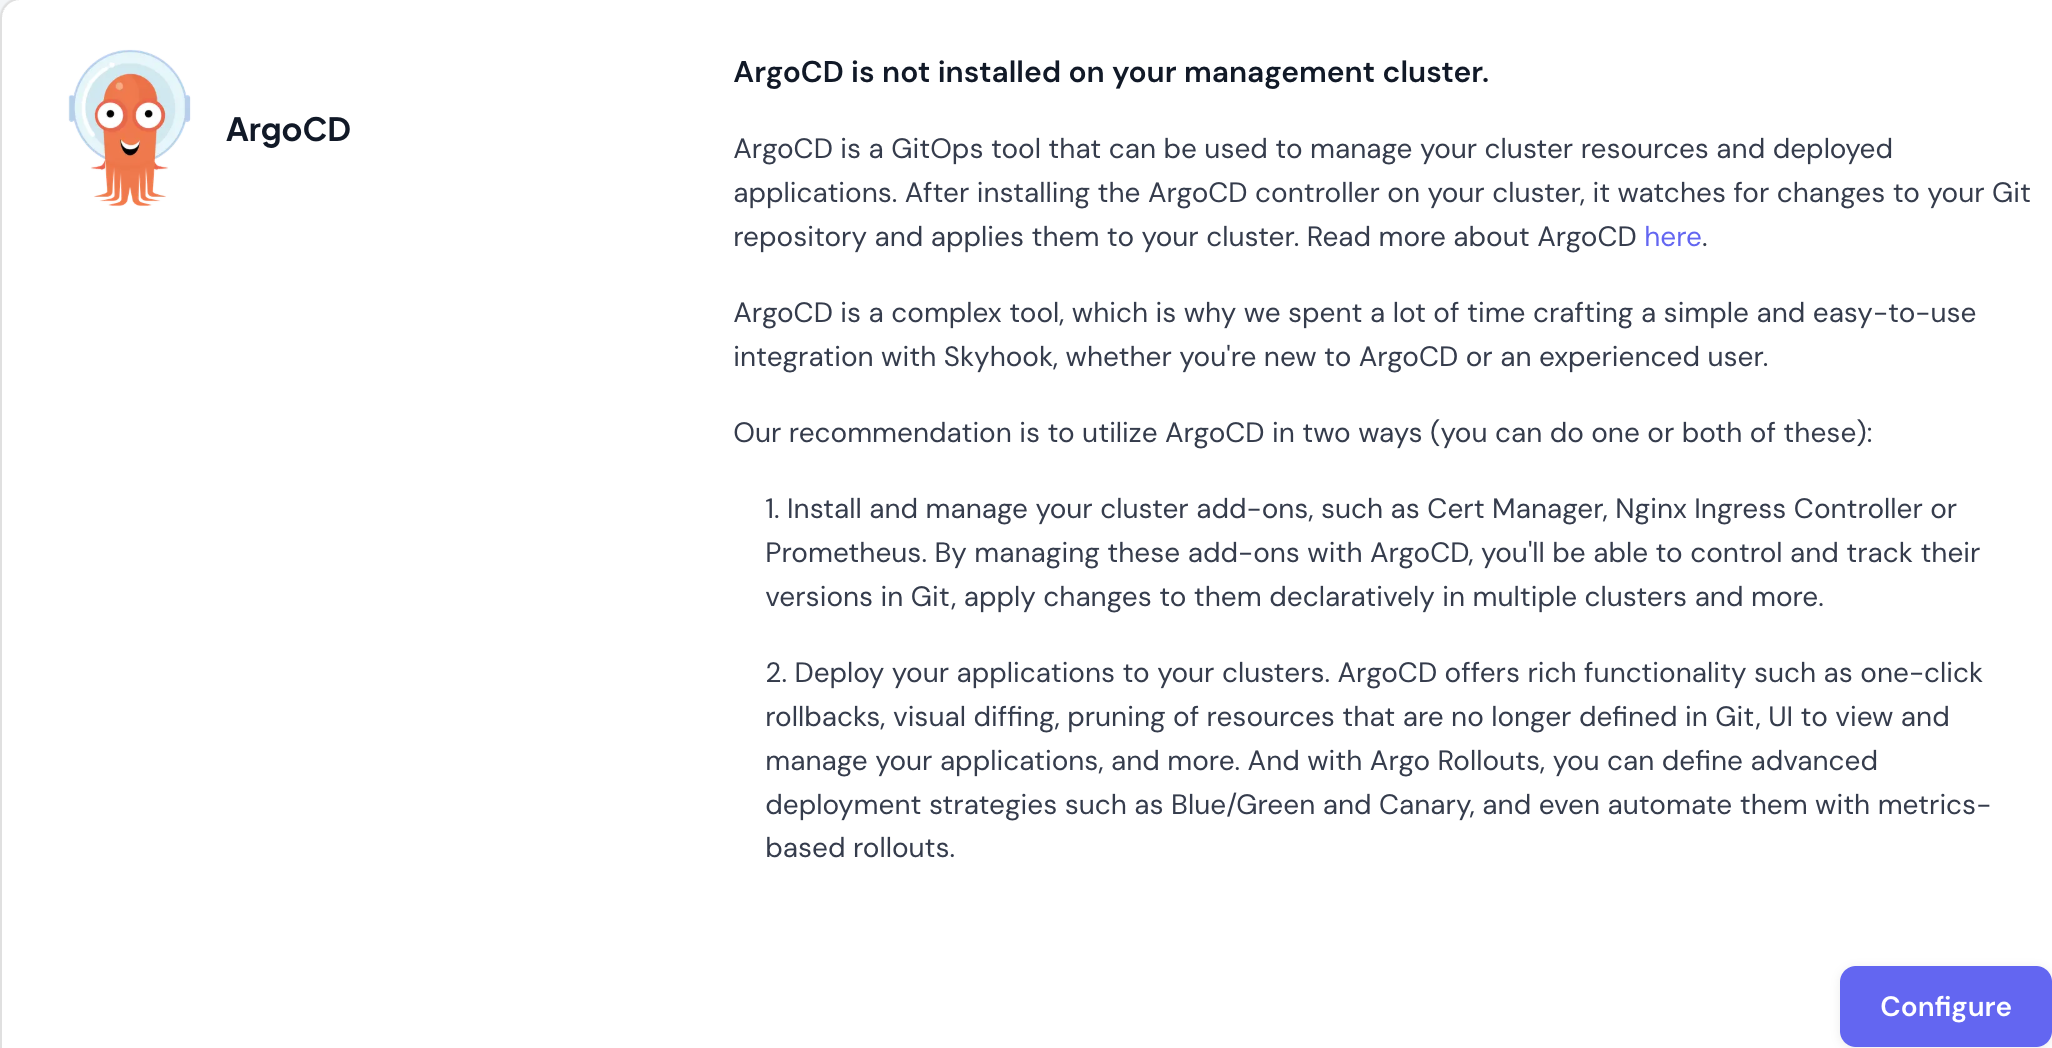
What is ArgoCD?
ArgoCD is a declarative GitOps continuous delivery tool for Kubernetes. It enables you to define and control the deployment of applications using Git repositories as the source of truth for deployment configurations. ArgoCD automates the process of syncing your applications with their desired state in Git, ensuring cluster configurations match your version-controlled definitions.Benefits of ArgoCD
- Automated Synchronization: Keeps your environment in sync with configurations stored in Git
- Declarative Setup: Manage infrastructure and application definitions declaratively and version them in Git
- Self-Healing: Automatically corrects drifts between the desired state in Git and the live state in the cluster
- Multi-Cluster Management: Manage deployments across multiple Kubernetes clusters from a single ArgoCD instance
- Visibility: Provides a graphical UI and CLI for visualization and management of applications and their dependencies
- GitOps Best Practices: Audit trail, rollback capabilities, and declarative configuration management
ArgoCD in Skyhook
Skyhook provides an integrated setup experience for ArgoCD and simplifies two primary use cases:- Manage cluster addons - Deploy and manage third-party tools like cert-manager, ingress controllers, Prometheus, and Grafana across your clusters. By managing these with ArgoCD, you can control versions in Git, apply changes declaratively across multiple clusters, and track configuration drift.
- Deploy your applications - Use ArgoCD for application deployments with features like one-click rollbacks, visual diffing, automatic pruning of resources no longer defined in Git, and a UI to view and manage your applications. With Argo Rollouts, you can implement advanced deployment strategies like Blue/Green and Canary deployments.
What Skyhook Provides
- GitOps overview page — a state-driven landing page showing every cluster’s GitOps status across your organization, with a tabbed view for Managed and Not-in-GitOps clusters
- 2-step repository configuration — repo settings first, then per-cluster selection (with addons and endpoints)
- Per-cluster setup drawer — a 4-step checklist (endpoint, GitHub credentials, ArgoCD install, bootstrap) that walks you through onboarding a cluster
- Bulk setup — select multiple clusters in the Not-in-GitOps tab and run “Set up N clusters” in one operation
- Incomplete-state CTA — managed rows with pending setup steps show “Setup incomplete · X/Y” with a Continue setup button so you always know exactly what’s left
- GitHub App integration — secure, fine-grained repository access with automatic token rotation; flows for OAuth creation, manual entry, and cached credentials
- Deployment GitHub App setup — a dedicated flow for installing the Skyhook GitHub App on your deployment repository, covered separately below
GitOps overview page
Navigate to Infrastructure → GitOps to open the overview.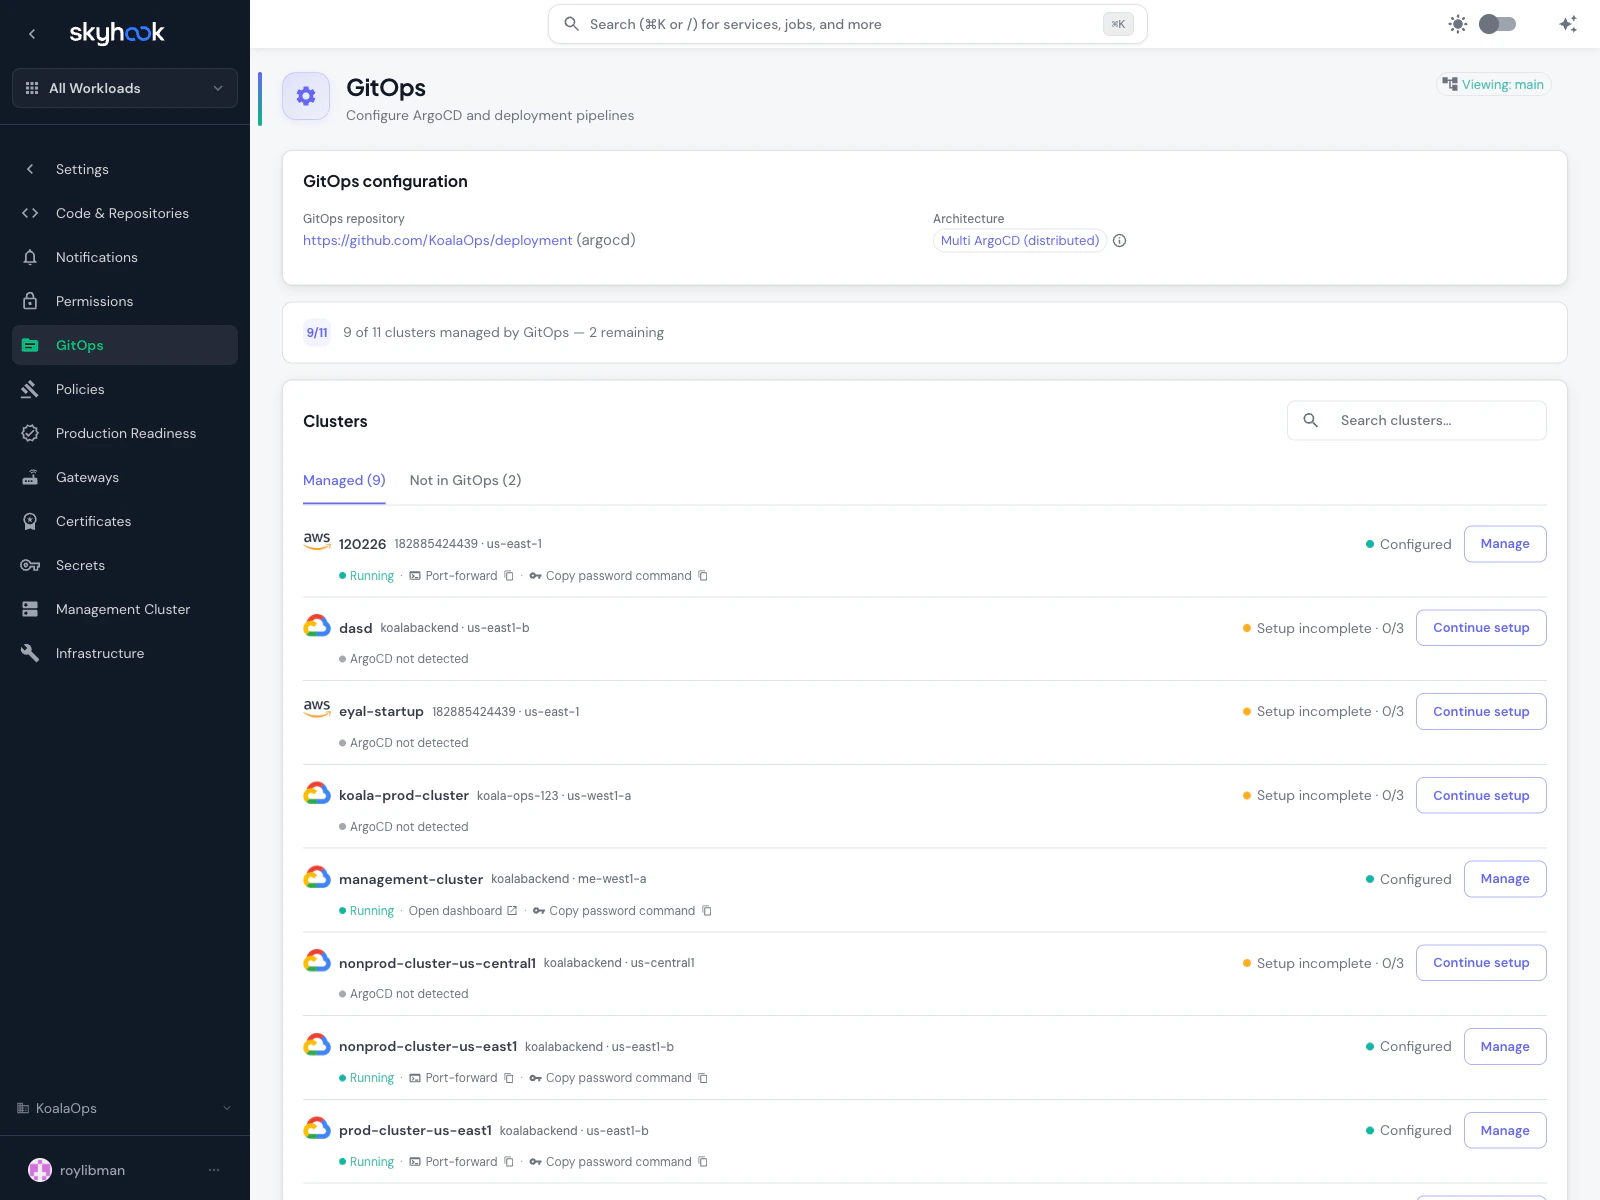
- Managed — clusters that have GitOps configured. Default tab. Shows cluster name, status (green dot + label), and a single outlined action button that changes based on state: Manage for fully configured, Continue setup for incomplete rows, View PR while a setup change is pending.
- Not in GitOps — clusters without GitOps yet. Each row has a Set up button that routes through the same single-cluster setup flow. Enable multi-select to run Set up N clusters across a group at once.
Per-cluster setup drawer
Clicking Set up or Continue setup opens a drawer with a 4-step checklist:- Endpoint — API server URL, any connection details
- GitHub credentials — create via GitHub App OAuth, enter manually, or pull from a cached session credential
- ArgoCD install — provision ArgoCD on the cluster (if not already running)
- Bootstrap — write initial manifests so ArgoCD can self-manage
Deployment GitHub App
Separately from the ArgoCD/GitOps credentials, Skyhook also offers a Deployment GitHub App for accessing your deployment repository — the repo where Skyhook writes generated Kubernetes manifests and CI workflows.When you need it
You need the Deployment GitHub App installed when:- Your deployment repository is private and Skyhook needs to push changes to it
- You want Skyhook’s deployment pull requests attributed to a GitHub App account (not a user)
- Your CI workflows need secrets from the deployment GitHub App to authenticate back to the repository
How to set it up
Use either the CLI or the UI — they produce the same result. CLI (recommended):GH_APP_ID / GH_APP_PK where the workflows can find them (organization secrets or per-repo, depending on your GitHub plan). Re-runnable if you want to reconfigure.
UI:
A Repository Settings → GitHub App section in your org settings has a setup dialog that walks through:
- Install the Skyhook GitHub App on your deployment repository from the GitHub marketplace link
- Complete the OAuth callback — Skyhook receives the installation ID and access token
- Verify access — Skyhook polls the repo for read/write access and displays a green status once confirmed
- The Repository Settings page (with a Configure button that opens the setup dialog)
- Any service detail page that needs access (with guidance on what’s missing)
- The post-creation step of a service import that can’t complete without repository write access
GH_APP_ID, GH_APP_PK) in your CI variables and flags them as missing adaptations you need to resolve before the service is fully operational.
Installation
Fastest path: the CLI
Before you run this
The CLI automates a lot, but it assumes the basics are in place. Confirm all five before running:- A management cluster is picked — the one cluster that will host ArgoCD
- At least one cluster is connected to Skyhook and shows ONLINE — ArgoCD needs a target to reconcile against
skyhook auth loginhas run in your terminal so the CLI has API credsghis authenticated (gh auth status) — used to create the ArgoCD GitHub App and push the initial GitOps repohelmis installed plus the cloud CLI for your provider (gcloudfor GKE,awsfor EKS,azfor AKS) — used in the bootstrap step
Run it
The Skyhook CLI automates the entire bootstrap end-to-end:skyhook onboard argocd runs the 4-step setup in order:
skyhook onboard argocd setup-repo— creates or reuses a GitOps repository and seeds it with the initial structureskyhook onboard argocd configure-access— creates a GitHub App scoped to ArgoCD so it can read your GitOps repo. This is a different GitHub App from the one used for cross-repo CI/CD access — see the three GitHub integrations tableskyhook onboard argocd bootstrap— runshelm installfor ArgoCD on each of your clusters, applies the cluster-admin AppProject, and applies the bootstrap ApplicationSetskyhook onboard argocd install— adds ArgoCD itself as a managed addon via GitOps, so from this point on it reconciles itself
Verify it landed
After the command finishes, confirm ArgoCD is actually running:OutOfSync, wait 30–60s and re-check — the first reconcile takes a moment. If it stays OutOfSync or shows errors, kubectl describe application -n argocd <name> points at the cause (usually a repo access issue from step 2).
Once everything is Healthy, skip ahead to Managing Addons. The rest of this section covers the UI flow and the manual install for users who want to do it by hand.
Prerequisites
Before installing ArgoCD, ensure you have:- A management cluster selected (the cluster that will host ArgoCD)
kubectlaccess to your management cluster- A GitHub repository for storing GitOps configurations (or plan to create one)
- Sufficient cluster resources (ArgoCD requires ~500MB memory minimum)
Step 1: Install ArgoCD on Your Cluster
Navigate to Organization Settings > GitOps and click Configure to start the setup wizard.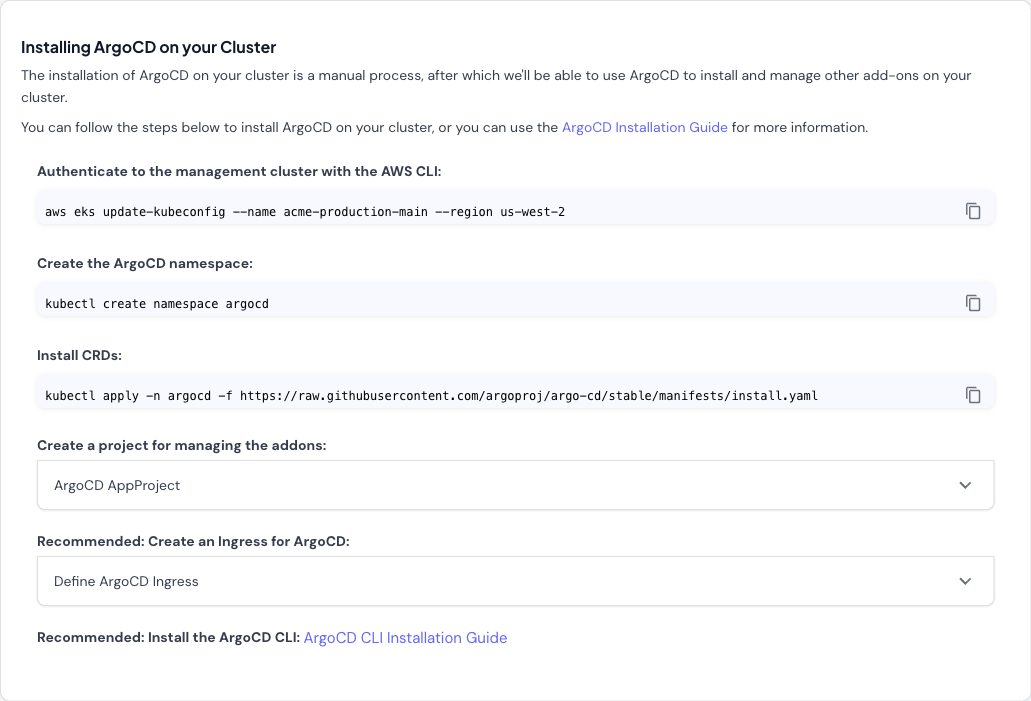
-
Authenticate to your management cluster:
-
Create the ArgoCD namespace:
-
Install ArgoCD CRDs and components:
- Create an AppProject for managing addons (expandable section in wizard): The wizard provides a pre-configured AppProject resource. This project scopes ArgoCD’s permissions and defines allowed repositories and clusters.
- Recommended: Create an Ingress for ArgoCD (expandable section in wizard): If you want to access the ArgoCD UI from outside your cluster, configure an Ingress. The wizard provides template configuration.
- Recommended: Install the ArgoCD CLI: Follow the ArgoCD CLI installation guide for your operating system.
Step 2: Configure GitOps Repository
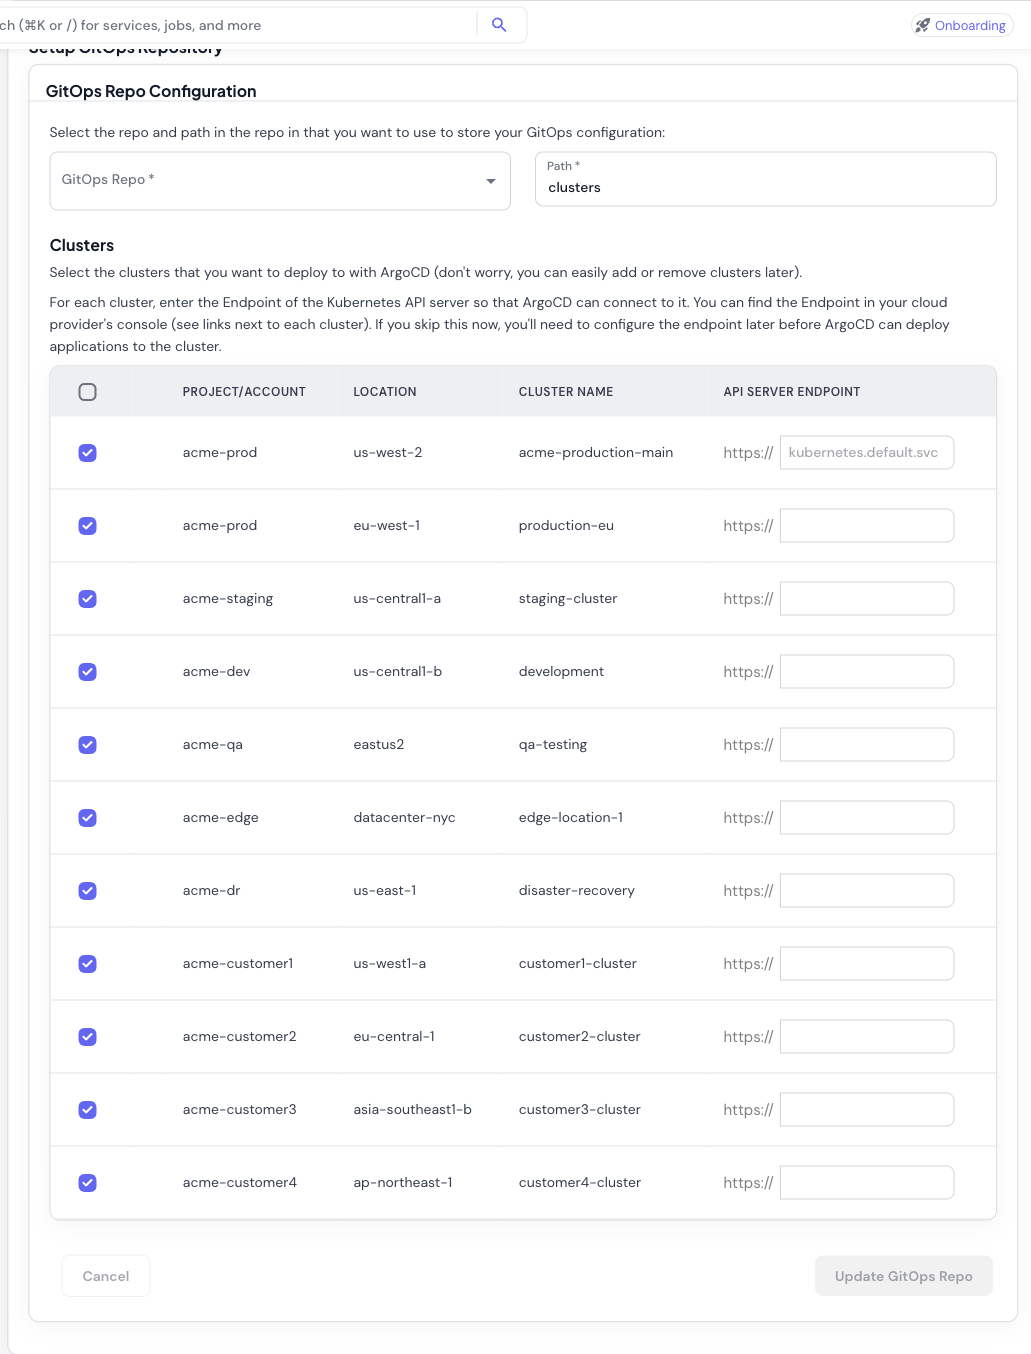
- Select GitOps Repository: Choose the GitHub repository where ArgoCD will look for application manifests and addon configurations.
-
Set Repository Path: Specify the path within the repository (default:
clusters). ArgoCD will monitor this path for Kubernetes manifests. -
Select Clusters: Choose which clusters ArgoCD should manage. All connected clusters are shown in the table with:
- Project/Account
- Location (region)
- Cluster name
- API Server Endpoint field
-
Configure API Endpoints: Enter the Kubernetes API server endpoint for each cluster:
- The management cluster uses
kubernetes.default.svc(pre-filled, since ArgoCD runs there) - For remote clusters, find the endpoint in your cloud provider’s console:
- AWS EKS: EKS Console > Clusters > API server endpoint
- GCP GKE: GKE Console > Clusters > Endpoint
- Azure AKS: AKS Console > Properties > API server address
- The management cluster uses
Step 3: Configure GitHub Integration
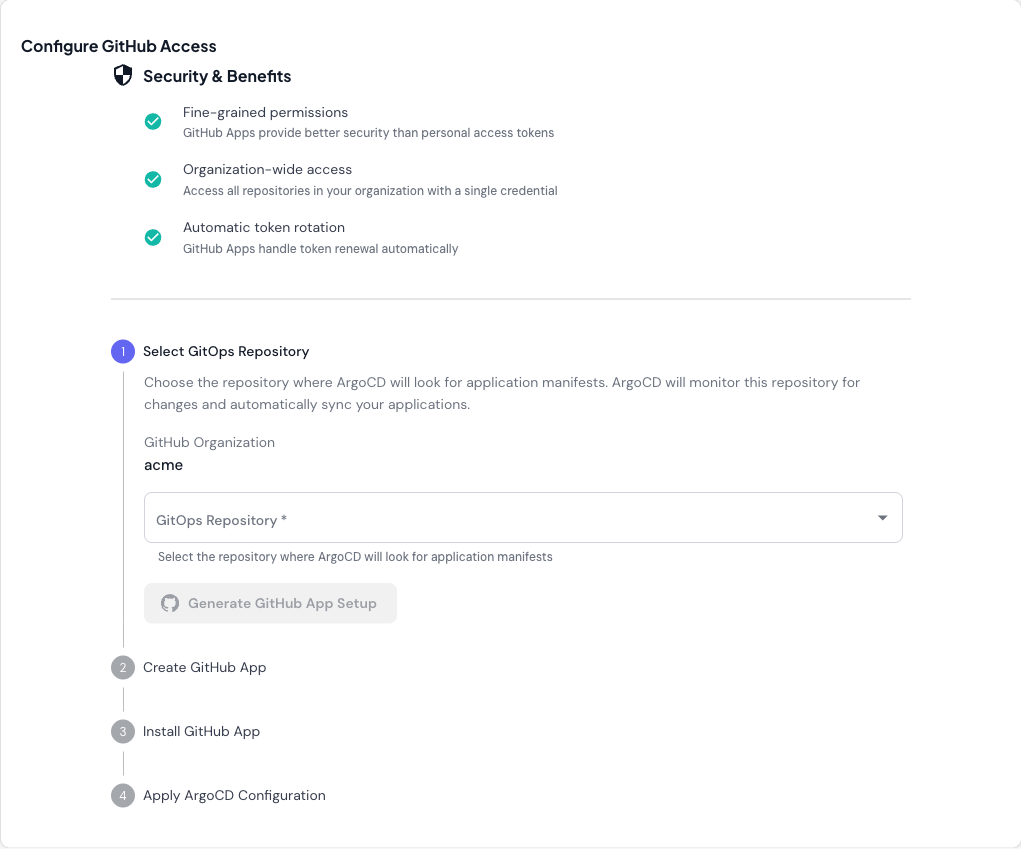
- Fine-grained permissions: Better security than personal access tokens
- Organization-wide access: Access all repositories with a single credential
- Automatic token rotation: GitHub Apps handle token renewal automatically
- Select GitOps Repository: Choose the repository from the dropdown
- Generate GitHub App Setup: Click the button to generate GitHub App configuration
- Create GitHub App: Follow the generated instructions to create the app in GitHub
- Install GitHub App: Install the app to your organization
- Apply ArgoCD Configuration: Apply the generated Kubernetes resources to configure ArgoCD
Managing Addons
Once ArgoCD is installed, you can install and configure cluster addons — cert-manager, Kyverno, Karpenter, OpenCost, Prometheus, and many others — from the Addons section in the sidebar. Skyhook generates ArgoCD Application resources for each addon you enable, commits them to your GitOps repository, and ArgoCD handles the rollout. See Addons for the full walkthrough covering the addon catalog, per-cluster configuration, importing existing addons, and secret management.Deploying Applications
For deploying your own applications with ArgoCD:- Define your application manifests in your GitOps repository
- Create ArgoCD Application resources (either through the ArgoCD UI or by adding YAML to your GitOps repo)
- ArgoCD syncs the application to your clusters based on the defined configuration
- Monitor application status and health in the ArgoCD UI
Troubleshooting
ArgoCD namespace already exists
ArgoCD namespace already exists
If the
argocd namespace already exists, you can either:- Delete the existing namespace:
kubectl delete namespace argocd - Skip the namespace creation step and proceed with installing CRDs
API endpoint configuration errors
API endpoint configuration errors
If ArgoCD can’t connect to a cluster:
-
Verify the endpoint is correct:
-
Check cluster credentials are configured:
- Ensure ArgoCD has network access to the cluster API (check firewall rules, security groups)
GitHub App integration fails
GitHub App integration fails
If GitHub App setup doesn’t work:
- Verify the app is installed to the correct organization
- Check the app has access to the GitOps repository
- Ensure the generated credentials were applied to the cluster correctly
- Review ArgoCD logs:
kubectl logs -n argocd -l app.kubernetes.io/name=argocd-repo-server
Addons not syncing
Addons not syncing
If addons aren’t deploying:
-
Check ArgoCD Application status:
-
View application details:
- Check ArgoCD can access your GitOps repository
- Verify the repository path contains valid Kubernetes manifests
Next Steps
- Configure your management cluster settings
- Learn about helmify-kustomize for converting Kustomize configs to Helm charts
- Explore ArgoCD documentation for advanced features
- How to Set Up ArgoCD on Kubernetes: Step-by-Step Guide - deep-dive on ArgoCD installation and configuration
- ArgoCD Multi-Cluster Architecture - centralized vs per-cluster patterns