New to Skyhook? Consider using the Onboarding Guide for guided setup. It walks you through cluster connection, ArgoCD installation, and addon configuration automatically.
Supported Cloud Providers

Google Cloud (GKE)
Fully supported

AWS (EKS)
Fully supported

Azure (AKS)
Private Beta
☸
Any Kubernetes
Fully supported
Interested in Azure support? Contact us to join the private beta.
Prerequisites
Before connecting a cluster, ensure you have:Required
- Existing Kubernetes cluster (GKE, EKS, AKS, or any conformant Kubernetes distribution)
- kubectl and helm installed locally
- Cluster access with permissions to install workloads
- Cloud provider CLI configured and authenticated (gcloud, aws, or az CLI) - only needed for managed cloud clusters
Highly Recommended: Cluster Addons
Skyhook works best with these common Kubernetes addons:- nginx-ingress controller - Automated ingress configuration and TLS management
- cert-manager - Automated certificate issuance and renewal
Addon Management: ArgoCD vs Manual Installation
We strongly recommend managing addons with ArgoCD for GitOps-based automation:- ArgoCD (Recommended)
- Manual Helm Installation
Why ArgoCD?
- Version-controlled addon configurations in Git
- Automated deployment and updates across clusters
- Drift detection and self-healing
- Centralized management from Skyhook UI
- Install ArgoCD on your management cluster (guide)
- Configure your GitOps repository
- Use Skyhook’s GitOps settings page to add addons
- ArgoCD automatically deploys and maintains addons across your clusters
Configuring cert-manager ClusterIssuer
- Via ArgoCD/Skyhook Addon
- Manual Installation
No manual configuration needed! When you install cert-manager through Skyhook’s addon system (via ArgoCD), a ClusterIssuer is automatically created and configured with Let’s Encrypt.
- Creating the
letsencryptClusterIssuer - Configuring HTTP01 challenge solver
- Setting up the necessary secrets
Connecting a Cluster
Using the CLI (recommended)
If you already have a kubectl context for the cluster, the fastest path is:skyhook onboard cluster connect detects your cluster from the current kubectl context, auto-fills the cloud provider / account / region, registers the cluster with Skyhook, and runs the helm install for the connector — all in one shot. You can pass --context <ctx> to target a specific context, --all to register every unconnected context at once, or --dry-run to preview.
Once the connector comes online, skip to Step 5: Verify Connection below.
For users who prefer the UI, or clusters where the CLI’s auto-detection doesn’t fit your environment, the per-provider flows below walk through it manually.
- Google Cloud (GKE)
- AWS (EKS)
- Azure (AKS) - Private Beta
- Any Kubernetes (BYOK)
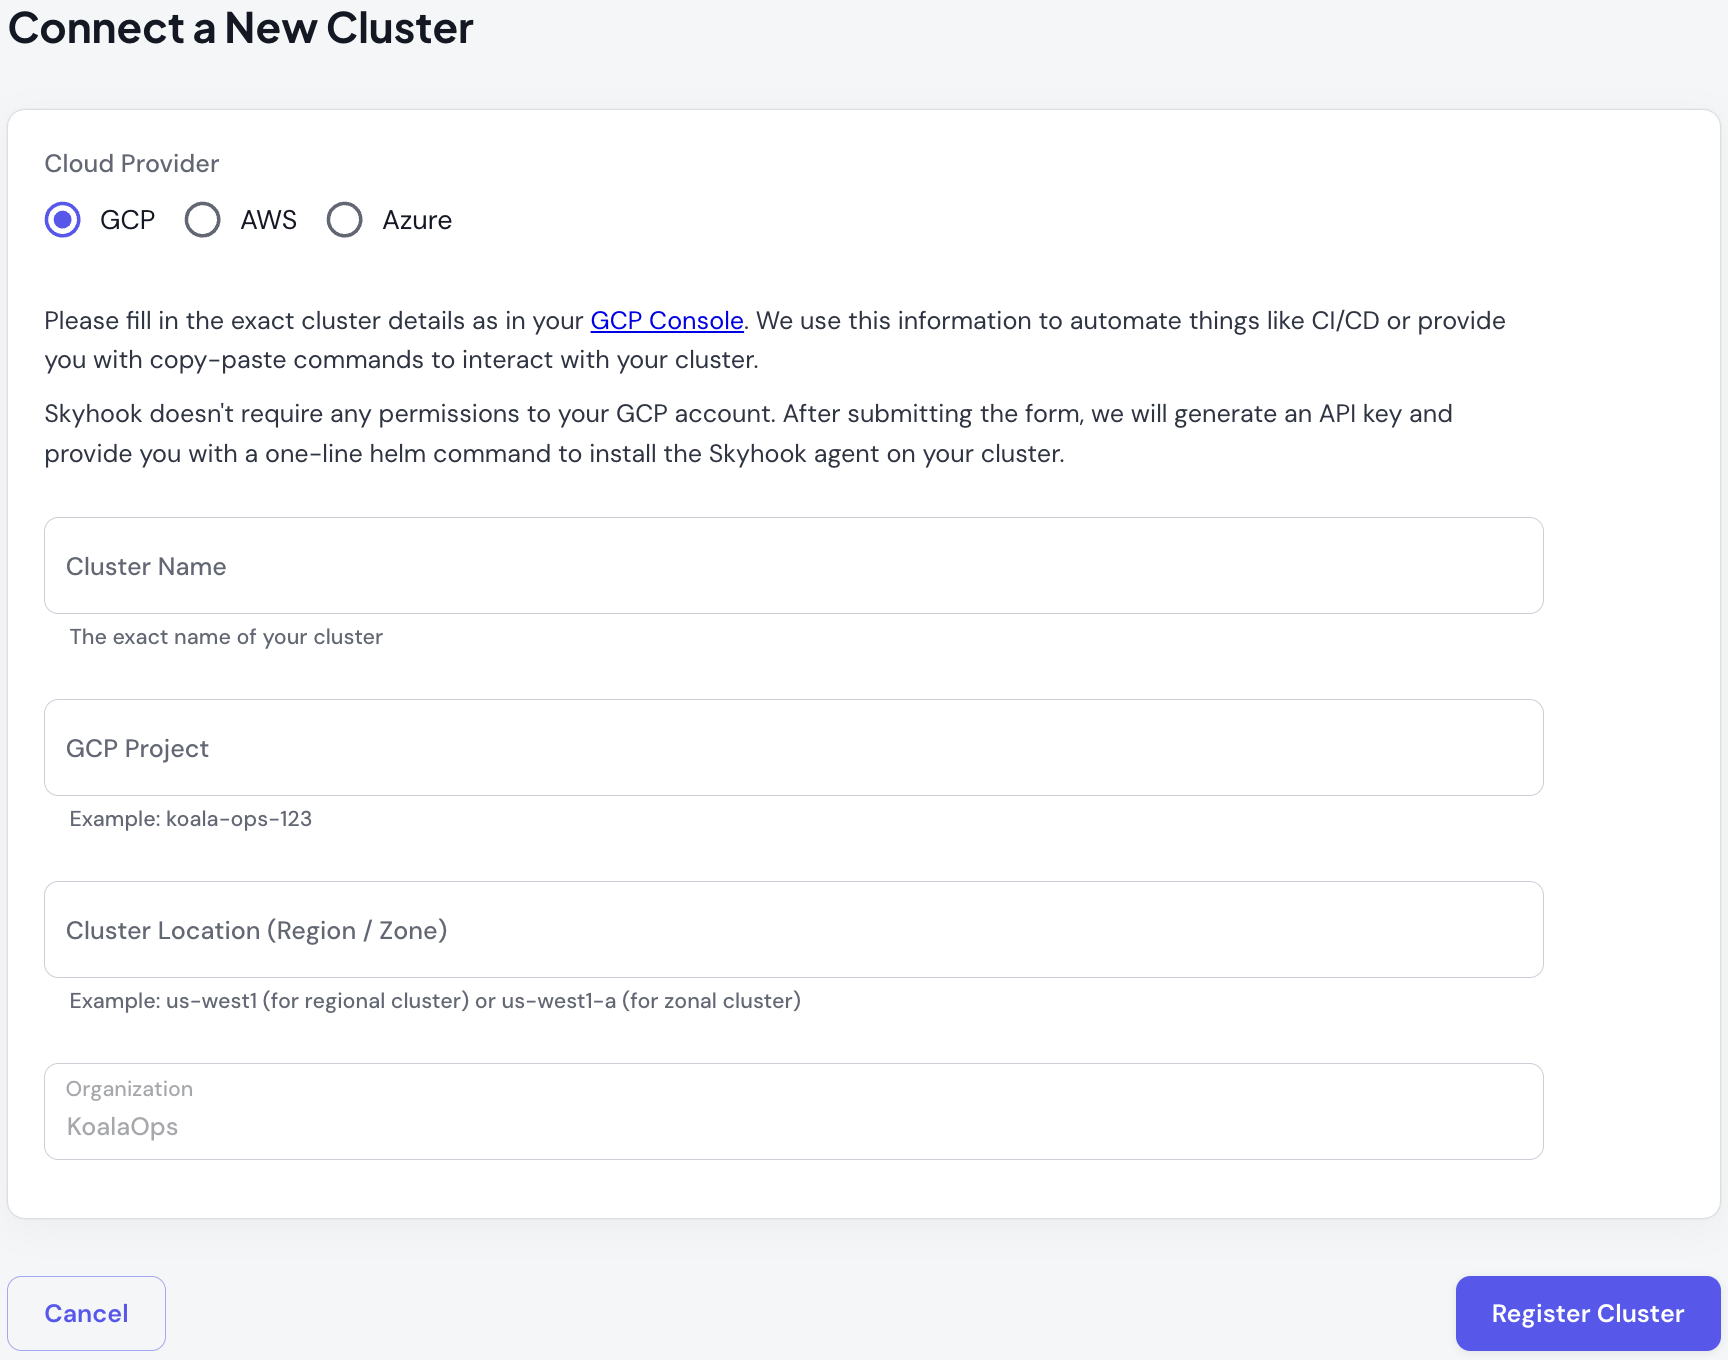
Step 1: Gather Cluster Information
You’ll need:- Cluster name (exact name from GCP Console)
- GCP Project ID (e.g.,
koala-ops-123) - Zone (e.g.,
us-west1-a) or Region (e.g.,us-west1for regional clusters)
Step 2: Authenticate to Your Cluster
Make suregcloud and the GKE auth plugin are installed:Step 3: Register the Cluster
- Navigate to Clusters → Connect in the Skyhook UI
- Select GCP as the cloud provider
- Fill in your cluster details:
- Cluster name
- GCP Project ID
- Zone or Region
- Click Register Cluster
helm install command with your cluster’s unique API key.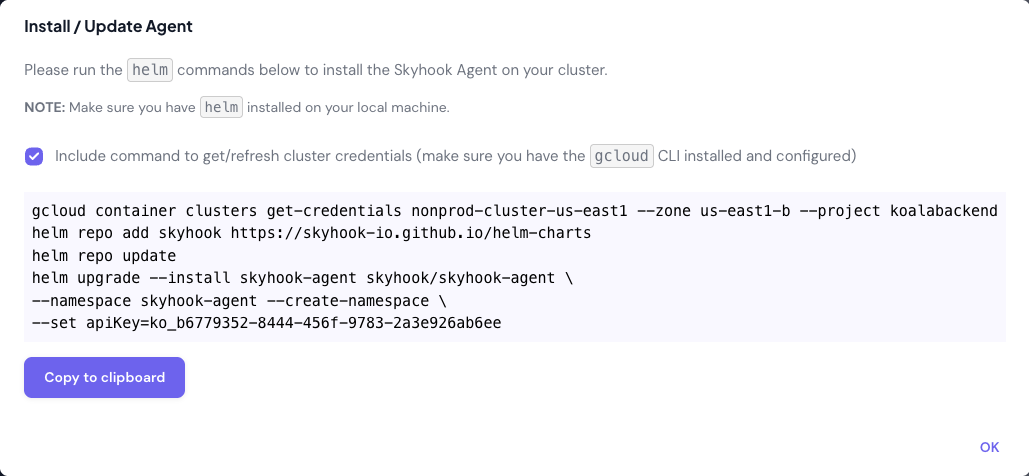
Step 4: Install the Cluster Connector
Copy thehelm install command from the previous step and run it in your terminal:Step 5: Verify Connection
Return to Clusters → List in the Skyhook UI. Your cluster status should change from WAITING FOR CHECK-IN (blue) to ONLINE (green) in under a minute.The Cluster Connector fetches cluster data on-demand when you use the Skyhook UI, ensuring you always see current information without unnecessary polling.Configuring DNS for Services
To expose services via ingress with custom domains, configure your DNS provider to point to your cluster’s load balancer IP address.Single Cluster Setup
Find your cluster’s external load balancer IP in the Cluster detail page (Networking section) or in your cloud provider’s console. Create an A record in your DNS provider:Multi-Cluster Load Balancing
If you’re using a global load balancer across multiple clusters, continue managing DNS through your existing setup. Skyhook doesn’t currently automate multi-cluster load balancing.Troubleshooting
Cluster Status Stuck on “WAITING FOR CHECK-IN”
If your cluster remains in WAITING FOR CHECK-IN status for more than 5 minutes:-
Verify the Cluster Connector pod is running:
Expected output:
STATUS: Running -
Check connector logs for errors:
-
Common issues:
- Firewall blocking egress: Ensure your cluster can reach
*.skyhook.ioon port 443 - Wrong API key: Verify you used the helm command from the Skyhook UI (includes correct API key)
- RBAC permissions: The agent needs cluster-wide read permissions (automatically configured by the helm chart)
- Firewall blocking egress: Ensure your cluster can reach
Permission Errors During Helm Install
Make sure you have admin permissions in the cluster:Next Steps
View Cluster Health
Monitor cluster status and detect problems
Inspect Resources
Drill down into pods, services, and more
Manage Services
Deploy and configure applications